Create what’s trending. Sell what’s hot
Instagram Reels dominate short-form video platforms, getting nearly double the engagement of other post types.
This guide explains how to make a Reel on Instagram that will take your video content marketing to the next level. We’ll cover Instagram’s creative resources, business tips, and strategies to help you create engaging content aligned with the platform’s algorithm.
Key takeaways
- Instagram’s creative tools, like audio, AR (augmented reality) effects, and timers, make Reels more engaging and interactive.
- The ideal Instagram Reel size is 1080 x 1920 pixels. Reels can be anywhere from 7-90 seconds long.
- Using trending music and sound effects that match your Reel’s topic increases engagement.
- Peak times to post Instagram Reels are 8am to 12pm and 4pm to 5pm PST on weekdays and until 8pm on weekends.
- Experiment with new editing techniques, stay authentic and respond quickly to trends for maximum impact.
How to make a Reel on Instagram
The quick, bite-sized nature of Instagram Reels has made them a highly engaging form of online content. If you’re looking to up your digital marketing game, you’re in the right spot – we’re about to teach you how to make a fantastic Reel on Instagram in six easy steps.
1. Open your Reels page
First, make sure you’ve got a smartphone and have given Instagram access to your camera, microphone, and device storage. Then, go to the Instagram home screen and tap the plus icon at the bottom of the page to start a new Reel.
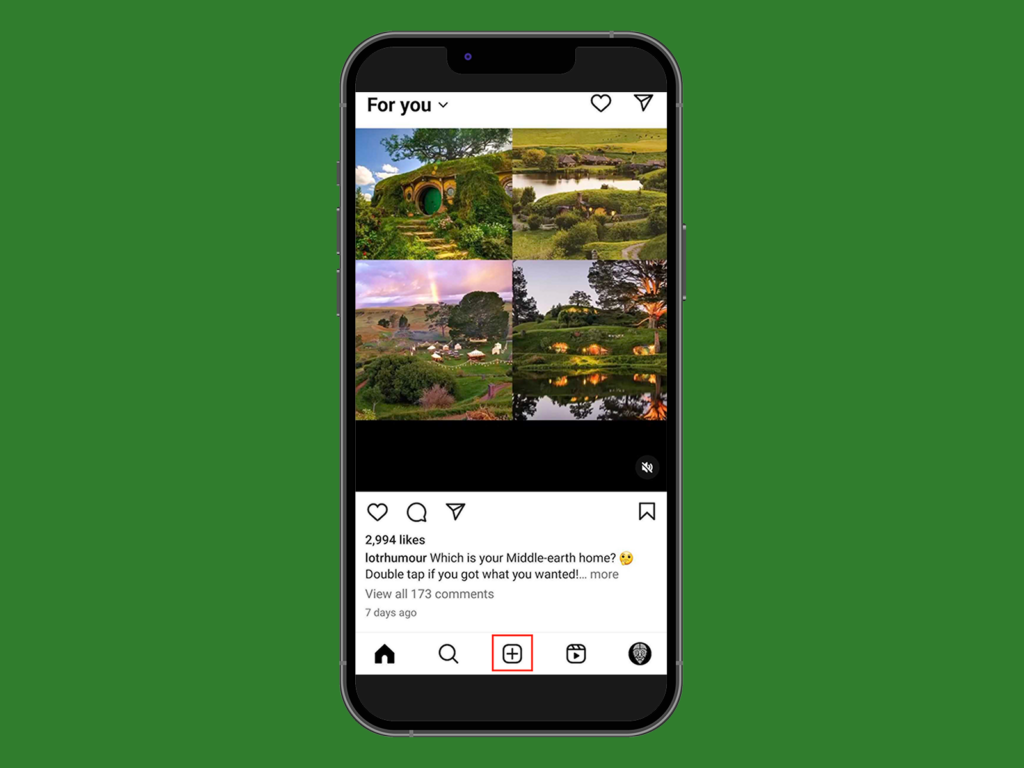
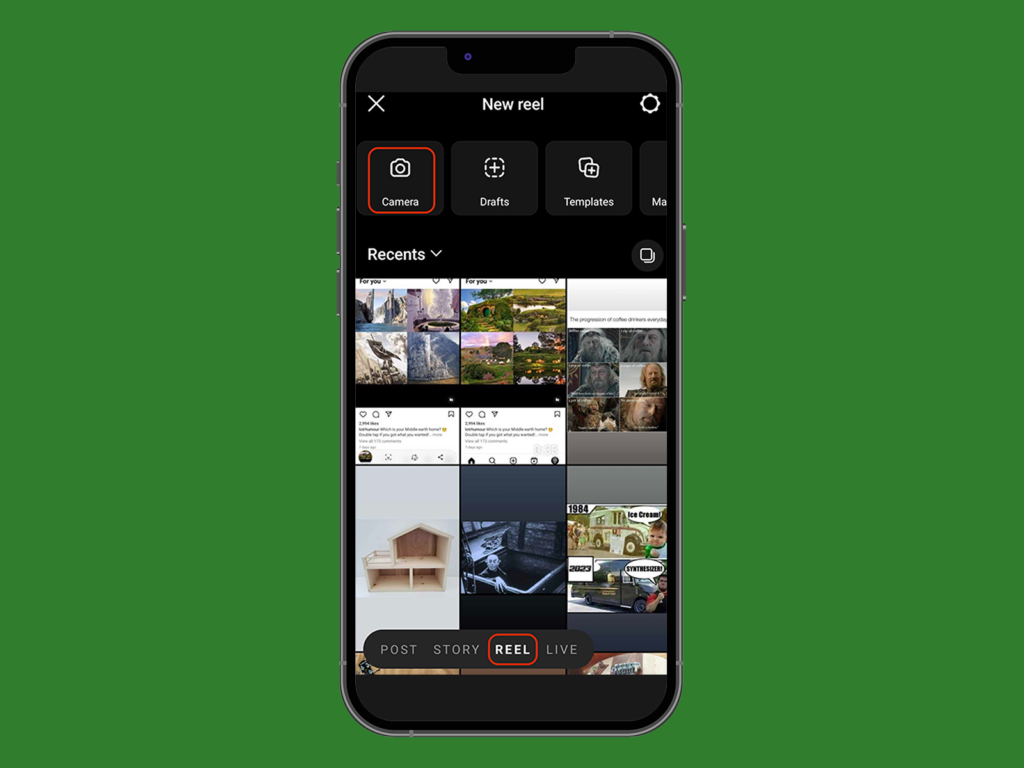
Now, swipe to the Reels tab from the bottom menu. You’ll now have two options: choose a video from your camera roll or record a new one.
To record a new video, tap the camera icon in the top-left corner.
You’ll see lots of tools on the screen.
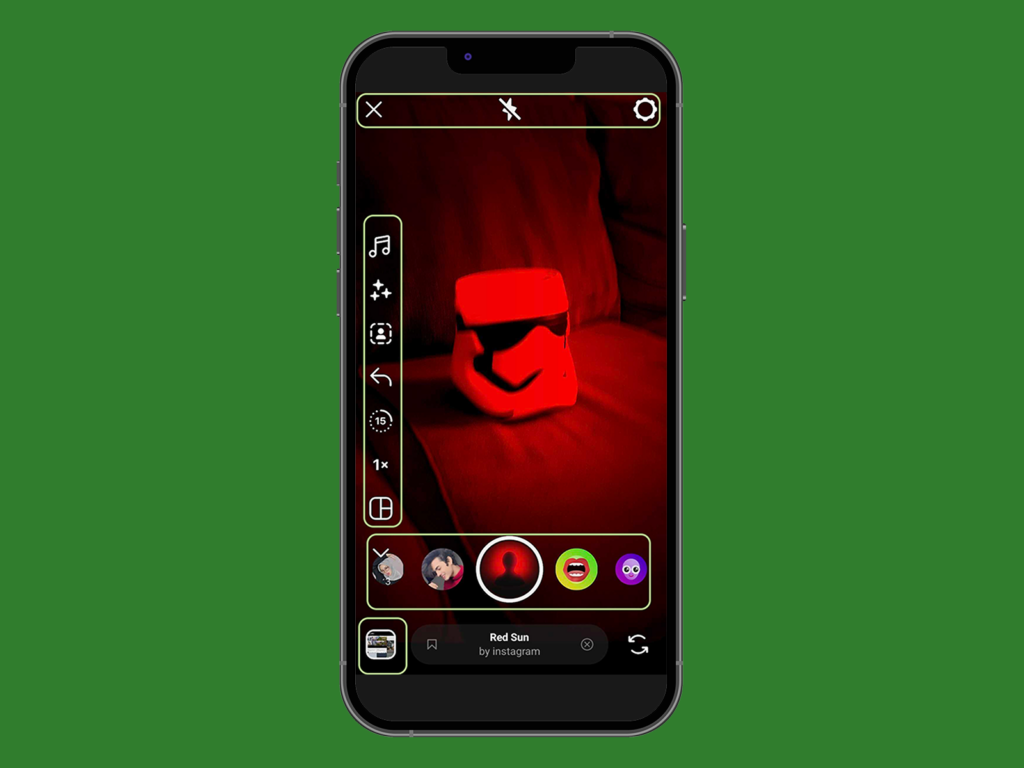
- Left toolbar – Audio library, effects, layouts, and other creative resources.
- Top right corner – Control settings.
- Top middle – Flashbulb settings, timer, and video speed.
- Capture button – Record, choose resolution, a selection of special effects.
- Bottom left corner – Media gallery.
2. Select audio
Tap the music note icon in the toolbar to go to Instagram’s music library.
It has several sections:
- For you: Music based on your interactions and profile preferences.
- Featured: Popular songs.
- New releases: Fresh, upcoming tracks.
- Original audio: Sounds created by others who create Reels.
Add audio first and build your content around it to make sure your Reel’s topic matches up with your chosen music.
While exploring Reels from other creators or brands to discover trending sounds, select Use Audio from public Reels to save it to your library for future use.
Add your own audio by creating original content, recording spoken lines, mixing tracks, or compiling edited clips. Your original audio will be available for others to use unless you limit your Reel to close friends or followers.
Licensed music from Instagram’s music library is usually cleared for use, but be mindful of copyright when uploading third-party or unlicensed audio.
3. Record video clips
Film and pause your Reels at appropriate cuts, all in a single take, or add clips of a pre-recorded video from your camera roll.
There’s also a timer feature for hands-free recording.
Find the timer tool on the left of your screen – the clock icon – to set your Instagram Reel length and timer countdown. Once you press record, the Reel will start countdown timers (three or ten seconds) before you start recording.
While recording, you’ll see a progress indicator at the top of the screen. Release your hold to stop recording at the end of your video clip, or let it finish on its own if you’re using a timer. Then, press the record button to keep filming or select a new timer to record multiple clips.
Tap Next when you’re done recording. Don’t worry – you can always edit later.
4. Add elements
How to make an Instagram Reel that pops? By adding some fun stuff. Tap on the sticky note icon at the top of the screen to choose stickers, turn on captions, add a location, and more. Tap the Aa icon to add text to the video. Make sure anything you add to your Reel is placed strategically and stays the same size throughout the video so your content is easier to follow.
Navigate to editing mode and select a clip to create seamless transitions between scenes. This makes your Reel more engaging for viewers.
Pay attention to spelling. Great content is often overshadowed by cringy grammar.
5. Change speed
In editing mode, tap on the clip you want to change. At the bottom of the screen, you’ll see a timer icon. Select it and choose between 0.1x to 10x speed.
Slowing the action at the right moment and ramping up to a faster pace can make a regular scene more dramatic and eye-catching for Instagram users.
6. Post your Reel
Once you’ve chosen the right audio, added effects, and set speeds, tap Next. The Instagram app will ask you to add captions. Make it short, place any necessary links for ads, describe the content, and add relevant hashtags.
Then, tag any people seen in the Reel, add a location tag if necessary, set a cover image, and choose where to share your content. Enable auto-generated captions on the Advanced Settings page, which we recommend if you haven’t included your own.
Once finished editing, save the draft and post it in the future, or click Next to share your Instagram Reel immediately.
Make it your way!
Instagram Reel size and length
For a professional-looking Instagram account, pay attention to Reel dimensions and video length. Start by ensuring your grid image is 110 x 110 pixels and centered so it looks good on a mobile device.
When creating IG Reels, aim for vertical videos with a full-screen aspect ratio of 9:16 (1080 x 1920 pixels). Avoid placing key details in the bottom fifth of the screen so they don’t get hidden by captions.
As for length, Instagram Reels can now be up to 90 seconds long. Here’s a breakdown of optimal lengths for different purposes.
- 7-15 seconds: Great for looping, these short-form videos drive higher engagement by increasing views and favorability in the algorithm.
- 15-30 seconds: Ideal for product showcases, seasonal campaigns, ads, or addressing current social trends.
- 30-90 seconds: Best suited for informative content like tutorials, testimonials, or collaborations with other creators.
Tailor your Reel size and duration to match your marketing objectives and engage your audience effectively.
Best times to post reels on Instagram
Here are the best times for posting Instagram Reels based on user engagement trends throughout the week. Use this table to maximize your reach and visibility by posting during peak activity hours on weekdays and weekends.
| Day | Best time to post a Reel (PST) | Engagement trend |
|---|---|---|
| Weekdays | 8 a.m. to 12 p.m., 4 p.m. to 5 p.m. | High daytime engagement |
| Weekends | 8 a.m. to 12 p.m., 4 p.m. to 8 p.m. | Extended evening engagement |
Your Instagram account should aim for daily video uploads. However, the algorithm can label too many posts in a single day as spam, stunting your progress and limiting your audience.
Instagram provides data-tracking analytics tools to put your engagement metrics into numbers. However, we recommend looking into third-party data tracking sites to see if they’ll be more useful.
How to repost a Reel on Instagram
If you’d like to repost someone else’s Reel to your page, there are a few ways to do it.
Repost to your Instagram Story
Sharing a Reel directly to your Story is possible through the app itself but will only show the first 15 seconds of the video before linking the Instagram user to the full cut on the original Reel page.
Tap the paper plane icon on the right side of the Reel, then select the Add to Story bubble at the bottom of the screen. However, Stories only last for 24 hours unless you add them to a Highlight on your page.
Download your video
If you’d like to upload a Reel to your own page or save it to your camera roll, tap the paper plane icon on the right of the Reel. Then, scroll through the bubbles at the bottom of the screen to find the Download button. Tap it to download the Reel to your device. Then, follow the usual steps to upload the video as a Reel to your own page.
As a rule of thumb, always credit the original creator when uploading someone else’s video as a Reel to your profile.
Remix or create a sequence
There are two options for posting an Instagram Reel to your feed without downloading it: remixing and creating a sequence. To view these options, tap the three dots on the right side of the Reel. A popup will appear with options to Remix or Sequence the Reel.
If you choose Remix, you’ll have some options to edit the Reel before posting it to your own Instagram profile.
The options are similar to the ones you’ll see when creating a Reel from scratch – adding filters, audio, captions, text, stickers, voiceovers, and more. When remixing a Reel, you must change something about the video before posting it to your feed. Once you’ve made adjustments, tap Next and proceed to the final stage before posting.
Making a Sequence lets you make all the same edits as Remixes, plus add your own clips to the original Reel. This is popular for reaction posts, answering questions posed in original Reels, or following up on a previous video. Trim the Reel to your desired length, then add your clips. Once done, follow the steps mentioned above to finish and post your Reel.
Make it your way!
How to promote Reels on Instagram
“Boosting” Reels is a fantastic way to expand your reach on Instagram. Your boosted Reels will appear across the platform, including the main feed, Stories, Reels tab, and Instagram’s Explore page, giving you plenty of visibility.
Here are a few things to know before boosting your Reel:
- You need a business account to boost Reels. If you’re using a personal account, don’t worry – it’s easy to switch.
- Interactive stickers, copyrighted music, GIFs, or third-party filters aren’t allowed on boosted Reels.
- You need a public account. Otherwise, users who don’t follow you won’t be able to see your Instagram Reel.
- You cannot boost Reels that you’ve shared on Facebook.
- The Reel should be under 60 seconds and in a 9:16 vertical aspect ratio.
Step 1: Head to your Instagram profile
The first step is locating the Reel you want to boost. Visit your profile and find the Reel – either in your main feed or under the Reels tab.
Step 2: Pick the Reel you want to boost
Tap on the Reel you’ve decided to promote. If you’re viewing the Reel from your Reels tab, tap the three dots icon in the bottom right corner and choose “Boost Reel.” In the main feed, you should see the “Boost” button below the Reel.
Step 3: Choose your goal and define your audience
Instagram will ask you to define your goal. Do you want more profile visits, website clicks, or direct messages? Select the option that aligns with your marketing objectives.
Choose who you want to target with your boosted Reel. You can either let Instagram handle it with automatic targeting or set up your own custom audience based on age, location, and interests.
Step 4: Set your budget and duration
Decide how much you’re willing to spend and for how long. Whether you want to run the promotion for a day or a month is entirely up to you and your budget.
Step 5: Confirm and boost
Review all your selections, and when you’re ready, tap Boost. Instagram will review your ad, and once approved, your Reel will be on its way to reaching a wider audience.
Why use Instagram Reels for business?
Since its launch in 2020, Instagram Reels has increased video engagement by 22%, with 53% of global marketers using short videos as a key part of their advertising strategy.
Reels are an excellent way to spread a message, connect with different niches, and align with modern desires for authenticity and relatability.
If you have a large following, consider using Printify to create branded merchandise to promote in your Reels. It’s a great way to earn money without upfront costs or the hassles of inventory management and shipping orders.
Instagram Reel tips and tricks
Need a few Instagram Reel tips to get the creativity flowing?
These insights will help you create Reels like a pro to increase traffic and captivate a wider audience.
Niche down
Successful Instagram marketing starts with defining your target audience, niche, and content format to align with your goals. Choose a topic you’re experienced in and passionate about to become an authority your viewers trust.
Visit our blog for profitable Instagram niches.
Use different lengths
Instagram Reels creators have consistently asked for a longer time allowance, giving more opportunities for creativity.
Post long-form videos along with your shorter Instagram Reels content for variety.
Use the slider in the timer menu to increase your video length even after recording a clip.
Use captions and text overlays
Captions are essential for users with hearing disabilities, but did you know that up to 92% of people watch videos with the sound off?
People read text faster than spoken language, so adding captions can hook them in before they start scrolling away. Use online tools like Google Cloud TTS, Veed.io, or Transkriptor to transcribe your audio or do it manually.
Play around with speed, effects, and filters
Keep your videos clear of clutter, but use Instagram editing tools like special effects, filters, motion arrows, location tags, GIFs, and images when suitable to pump up engagement and entertainment value.
Add filters and effects by tapping the Stars icon to change shadows, color grading, and focus points, but don’t overdo it – excessive edits can make your Instagram Reels look low-quality and unrelatable.
Experiment with your video layout
Add multiple video sequences playing off one another on a single screen. You can use this effect to compare two different video clips, duet another artist, or jazz up your Instagram Reel with additional clips over the main video.
Reposting from TikTok? Think again
The Instagram algorithm de-prioritizes visible reuploads from other apps, which effectively shadowbans your content from the Reels tab and Explore page.
There are editing tools to erase the TikTok watermark, but this can reduce your video’s quality, so we recommend creating original Instagram Reel content instead. Reposted content will downgrade your brand image.
Hop on trends
Trends shift quickly, so when you spot one that fits your content, act fast. Share smaller trends in your Stories, and don’t hesitate to repost or reorder clips if a past topic resurfaces. Add relevant hashtags to increase engagement.
Here are a few 2024 trends to watch:
- AI-generated content: Using AI tools for creative visuals, voiceovers, or captions is pretty popular.
- Sustainability themes: Modern audiences really like content with eco-conscious themes.
- Collaborative Reels: Partnering with influencers or brands for joint content is very common and a great way to monetize your Instagram Reels.
- Behind-the-scenes footage: Audiences love authenticity and transparency, so show them what goes into your content.
Don’t limit yourself
Stay on top of new design software to make editing easier and more fun. Practice using additional lighting types and practical effects, and add music that goes along with your visuals.
Always push the boundaries of what other creators post in the Instagram Reels tab to get more viewers’ attention and grow your following.
FAQ
To create Instagram Reels:
- Open Instagram and tap the + icon on your home screen.
- Select the Reels tab, then either record video clips or upload pre-recorded ones.
- Use Instagram’s editing tools like audio, effects, and captions to enhance your Reel.
- After editing, click Next to add a caption and tags, and share your Reel.
Figuring out how to make Instagram Reels with photos and music, open the Reels tab and choose the gallery icon to select photos from your camera.
Put the photos in order, then tap the music note icon to add songs from the Instagram music library. Adjust the time each photo is displayed to match the beat of the music, add effects and filters, and then post the Reel as usual.
To create successful Reels with entertaining videos from your smartphone, select the gallery icon on the Reels creation screen. Select the videos you want to include and trim or rearrange them if needed. Then, add music, effects, or captions before finalizing and sharing your Reel.
It may take one or two Reels to get the hang of things, but if you follow the steps in this guide, you’ll be making Reels like a pro in no time!
Ready to create an Instagram Reel?
Once you know the basics, create a Reels style you’re proud of by being authentic, adventurous, and responsive to trends.
Here are some final tips on how to create a Reel on Instagram that viewers will love:
- Define your niche and audience
- Use popular audio
- Size Reels to 1080 x 1920 pixels
- Choose the right Reel length
- Keep screens clutter-free
- Post daily
- Promote and experiment with new techniques


