Your logo, your brand, your merch
Your logo is often the first impression of your brand, so it’s important to get it right. In this guide, you’ll learn how to make a logo in Photoshop with simple, practical steps.
Whether you’re building a business or creating for fun, this Photoshop tutorial will walk you through the entire logo design process.
This post may contain affiliate links, which means we may earn a commission if you make a purchase through those links. This comes at no additional cost to you.
How to design a logo in Photoshop in 6 easy steps
Designing a logo may seem complicated, but Photoshop makes the process straightforward once you know the basics. We’ll walk through six simple steps that show you how to make a text logo in Photoshop – from setting up your canvas to exporting a polished design you can use on products and digital platforms.
This Adobe Photoshop logo tutorial is written for a fully updated, purchased Adobe product, but the instructions may work on other free alternatives with a similar toolset and User Interface.
1. Choose the right Adobe Plan
While you don’t need a premium subscription to start designing a logo, having Photoshop available, especially with the flexibility of cloud-based tools, will streamline your workflow.
Here’s a snapshot of Adobe’s current pricing:
| Plan | Price (USD) | Includes |
| Photography Plan | $19.99/mo (annual commitment) | Photoshop + Lightroom, 20 GB cloud storage |
| Single App (Photoshop) | $22.99/mo (annual commitment, desktop + mobile) | Photoshop on desktop, iPad, and iPhone |
| Creative Cloud Pro (formerly All Apps) | $54.99/mo (annual commitment) or $69.99/mo (standard pricing) | 20+ apps (Photoshop, Illustrator, etc.), 100 GB storage, generative AI credits |
| Back-to-School Deal | $42/mo for first year (40% off) | Full Creative Cloud Pro suite at a limited-time discount |
Which should you pick?
- Photography Plan ($19.99/mo) – Best value if you only need Photoshop and Lightroom.
- Single App Plan ($22.99/mo) – Ideal if you want only Photoshop with broader device support.
- Creative Cloud Pro ($54.99/mo or discounted) – Great for designers who want access to Illustrator, InDesign, Premiere Pro, and more, all in one bundle.
Adobe also partners with affiliates like Printify to offer exclusive discounts and free trial extensions on certain plans. Be sure to check Printify-Adobe affiliate deals before subscribing.
2. Explore available tools
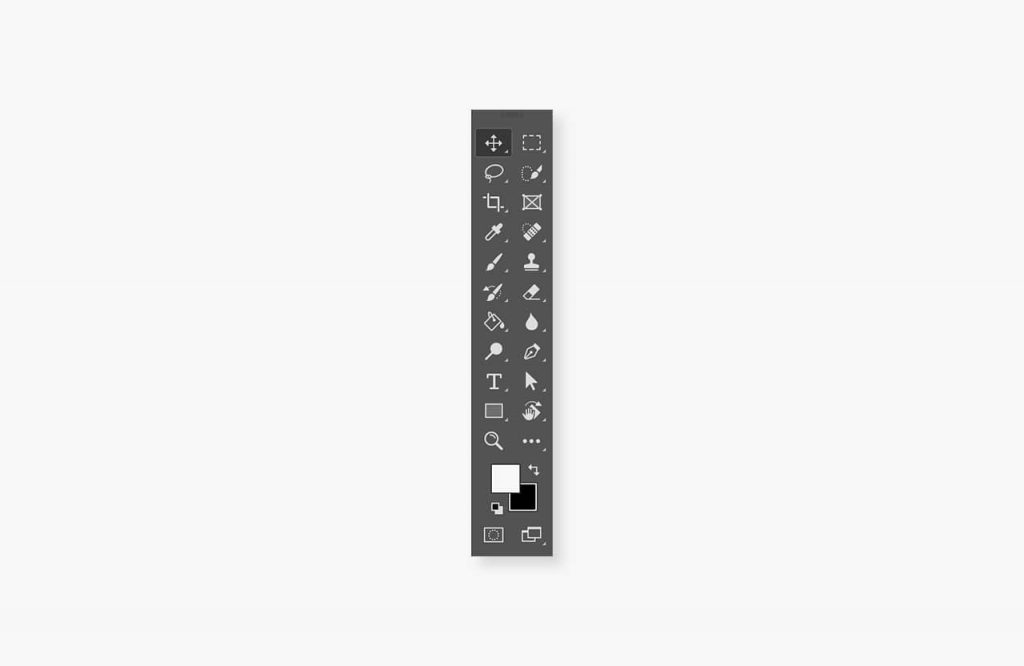
This Photoshop tutorial section will guide you through the essentials – like the menu bar, options bar, dashboard, and edit windows – so you can keep things simple.
On the left side of your Photoshop workspace, you’ll find a full set of editing tools, grouped by function.
- View tools – Zoom and hand tools
- Select tools – Move tool, direct selection tool, shape select, lasso select, etc.
- Enhance tools – Eyedropper, smart brush, clone stamp, blur, smudge, sharpen, etc.
- Draw tools – Brush, pencil, pen, eraser, gradients, shape tools, type tool, text box, etc.
- Modify tools – Crop, perspective, straighten, content-aware, align tools, etc.
- Color selection – Primary and secondary color options
Most graphic software uses a similar layout, so once you’re familiar with Photoshop’s system, you’ll feel at home. For Photoshop logo design, the key ones to practice are the move tool, pen tool, shape tool, and text tool – these will form the core of any logo idea.
Expert’s tip
“Before jumping into Photoshop, it’s important to have a rough idea laid out on paper. You can upload a picture of your rough design to Photoshop, and then start making it digital!
Don’t be afraid of the Pen tool! With practice, the Pen tool will be your most valuable asset. It allows you to make selections and paths in any way imaginable – and will make your life easier.
Use the application tools to your advantage. The shape tools, such as the Ellipse tool or the Rectangle tool, are a great way to start constructing your own logo.”
Madison Thompson, Graphic Designer
3. Start by creating a Canvas
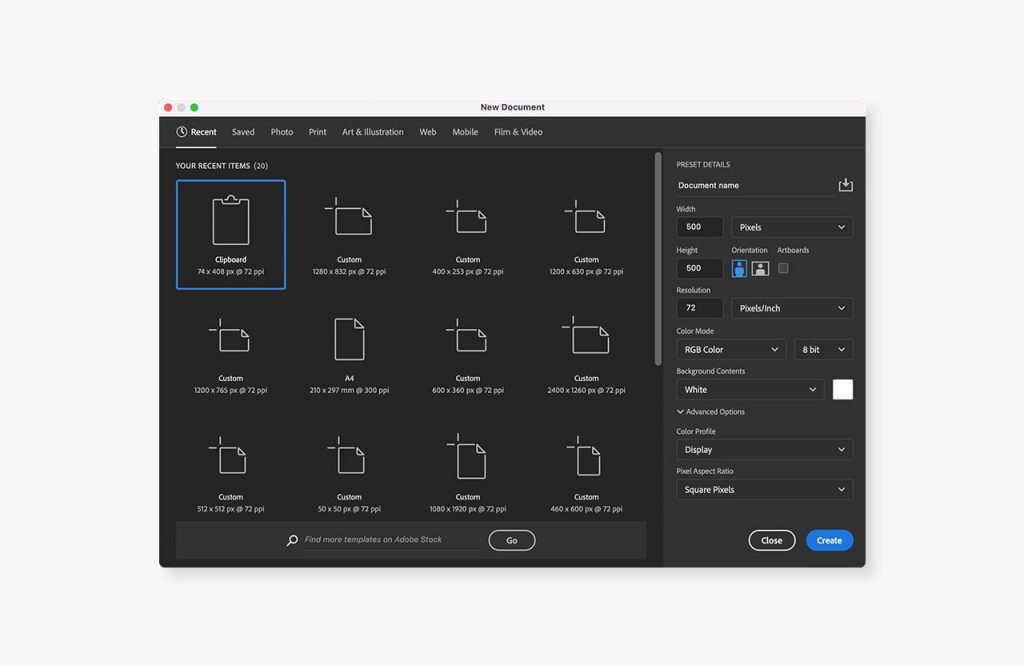
Open Photoshop and go to the top menu. Select File > New to create a new Photoshop document. Give your project a title and choose Custom Document from the drop-down menu to set your own dimensions.
For this tutorial, we’ll use the default 500 x 500 pixels, but you can increase the canvas size if you need more room for your logo. Click OK, and a white box will appear as your canvas. You can adjust the canvas size later if you want more space.
Prepare your workspace:
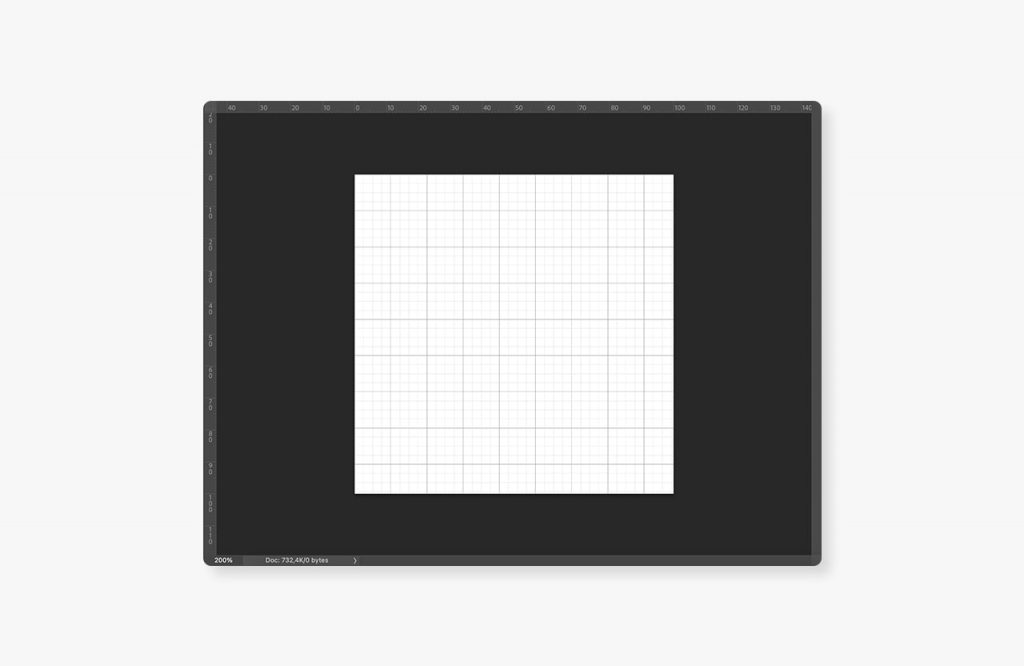
In the main menu bar, select Window > Workspace and choose Essentials or Reset Essentials to return to the default setup.
Go to View > Show and enable Grid and Smart Guides.
Then open View > Snap to and select Grid. You’ll now see a square grid over your canvas, which helps keep your shapes measured and aligned.
Create a new layer:
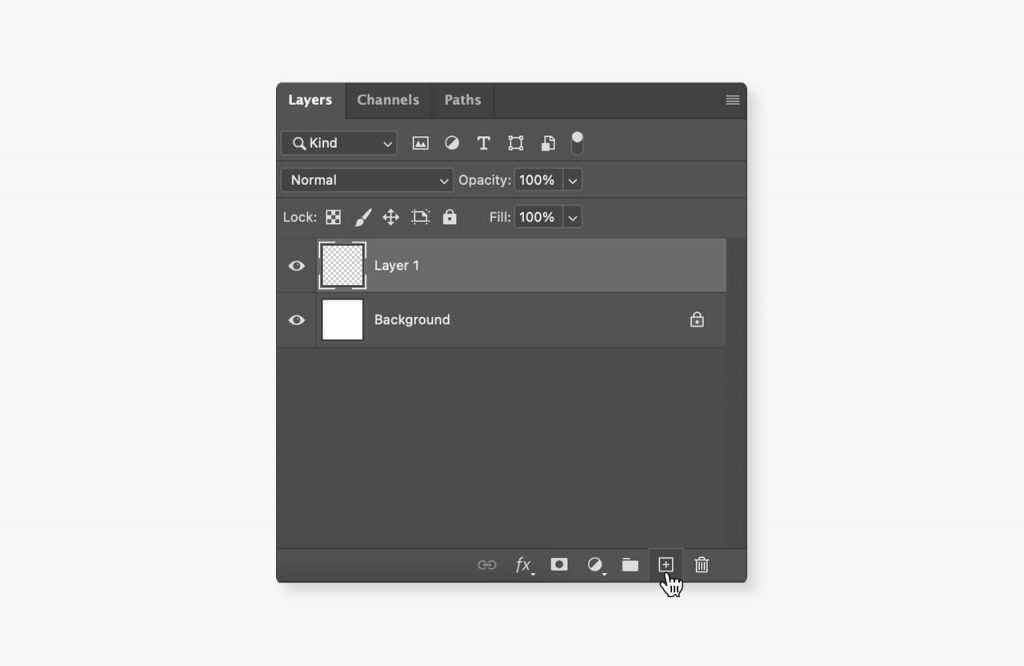
Keep the original background layer intact, so you have a clean white backdrop for your design.
In the Layers panel, click the Create a new layer button (the page icon with a folded corner). Select the new layer by clicking on its name.
Double-click the layer’s name if you want to rename it.
You can also import a sketch or photo onto a separate layer as a reference while building your logo.
To make a transparent logo, delete the background layer when you’re done and export the file without a background. The empty space will remain transparent. You can also use the Magic Wand tool to remove solid backgrounds quickly and keep your logo clean.
To make the layer more solid, adjust the opacity slider in the Layers panel to increase or decrease the transparency.
Expert’s tip
“The utmost important thing to keep in mind when starting to design a logo is who your audience is. It is important that your logo resonates with your target audience, but it should also tell them who you are as a brand!
Another thing to remember: keep it simple, but unique! Your logo should give your audience a good idea of who you are, but you don’t want it to tell your whole brand story. Your logo should also have a unique element to it, so people can easily recognize your company.”
Madison Thompson, Graphic Designer
4. Draw a shape
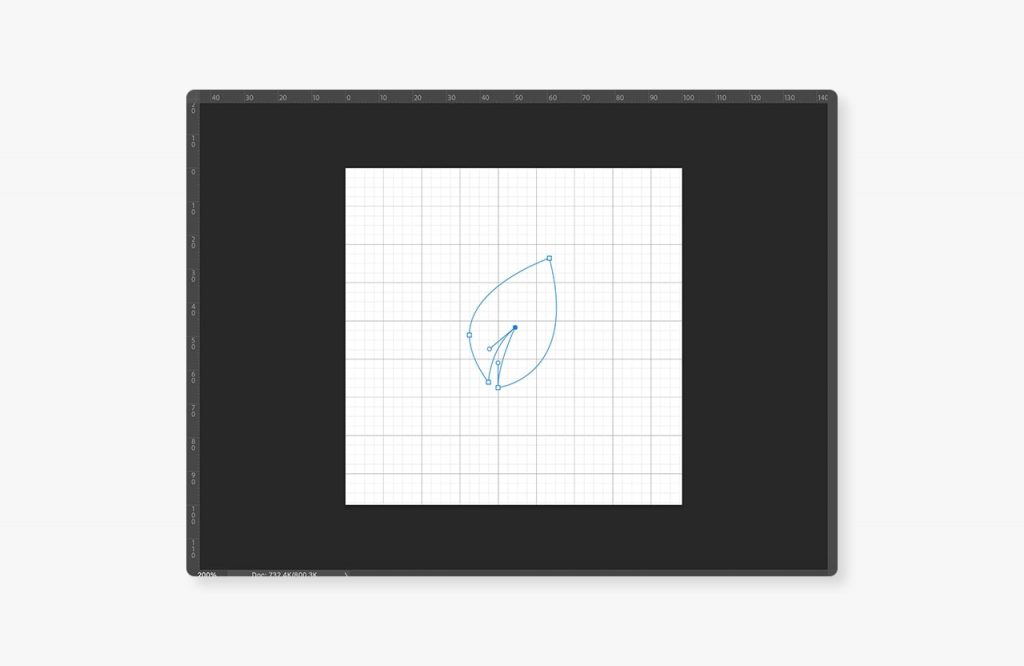
To start shaping your design, select the pen tool (fountain pen icon) from the toolbar. At the top of the Essentials Workspace, you’ll see several modifier settings.
- Fill – Change the inside color of the shape or remove it completely
- Stroke – Adjust the outline color, thickness, or style (solid, dotted, spaced, etc.)
Draw with the pen tool:
- Click the canvas to create a point, then click again to connect it with a line.
- Click and drag to create curved or angled lines. Use the grid as a guide for clean proportions.
- To refine, hover over a point and wait for the plus (+) or minus (–) icon to add or remove anchor points.
Draw with the shape tool:
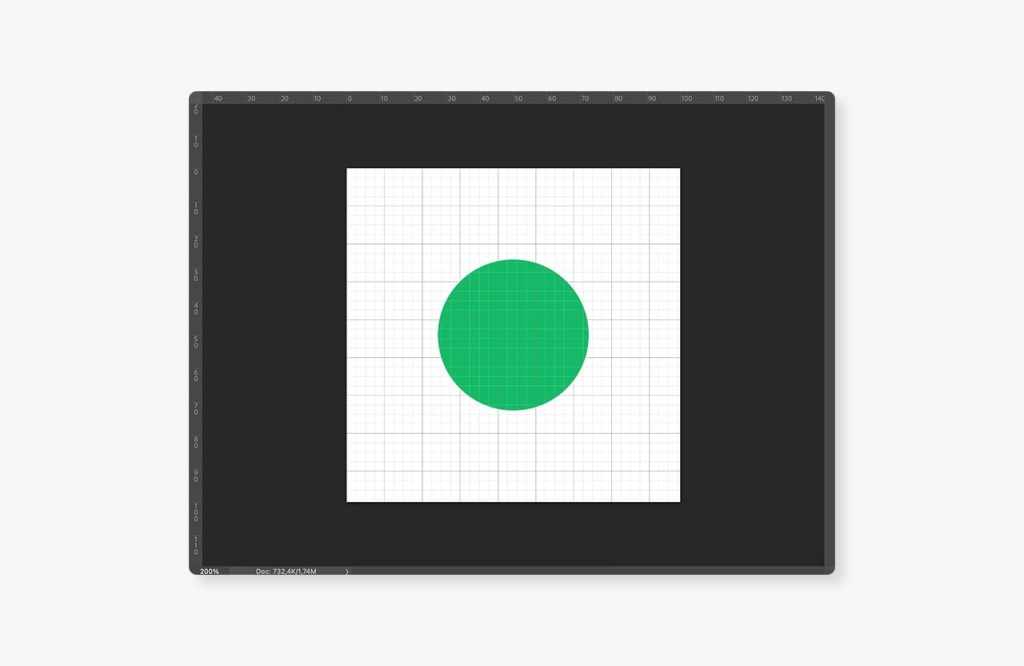
- Click and hold the Rectangle tool button to choose from rectangles, rounded rectangles, ellipses, polygons, lines, or custom shapes.
- Open the shape library in the top dashboard under Custom Shape to explore hundreds of ready-made options.
Move and transform your shape:
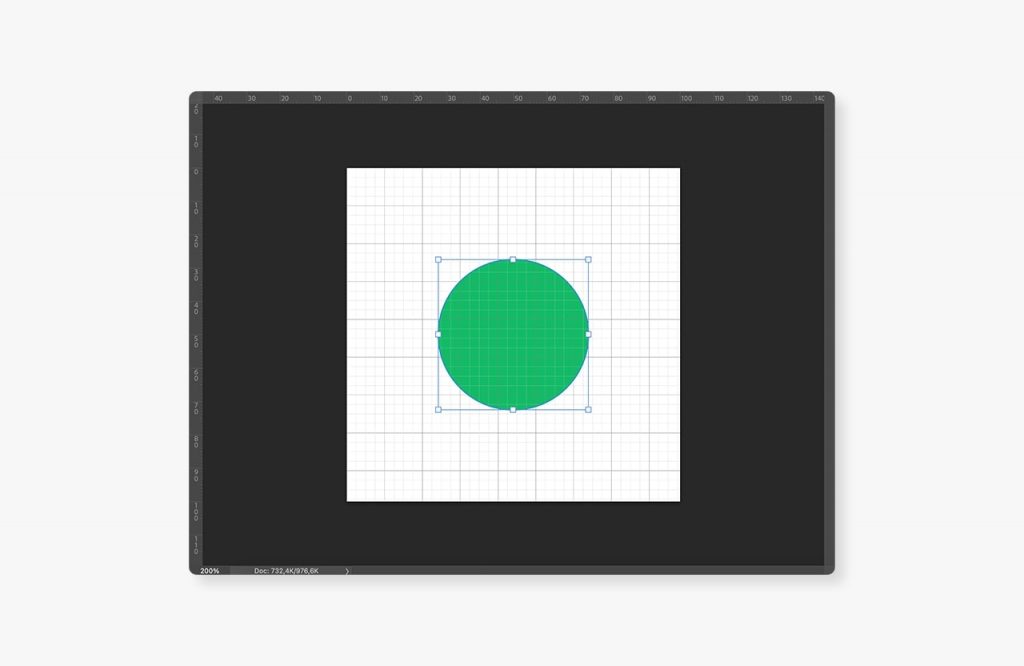
Use the move tool to drag your shape around the canvas. By default, it snaps to the grid, but you can disable snapping from the main menu bar if you want more freedom.
To resize, go to Edit > Free Transform or press Ctrl+T (Windows) or Command+T(Mac).
- Hold the Shift key while dragging a corner to scale evenly.
- Hold Alt while dragging to stretch dimensions independently.
To rotate, hover just outside the shape’s outline and drag.
Press Enter to confirm changes. If you’re not satisfied, use Edit > Undo or pressCtrl+Z (Windows) or Command+Z(Mac).
Organize your Layers panel:
Each new shape appears on its own layer. You can move them independently by selecting the right layer.
To combine shapes:
- Merge layers – Select multiple layers with Ctrl+click(Windows) or Command+click (Mac), right-click, and choose Merge Layers/Shapes.
- Group layers – Select multiple layers, right-click, and choose Group from Layers. This keeps them in a folder so you can move them together or adjust them individually.
Ensure key elements remain clearly visible so they don’t get obscured by other parts of the design.
Use the align tools to line up shapes perfectly, and check how your design looks across other layers to stay organized.
Duplicate objects for intricate designs:
To make a copy of a layer, right-click and select Duplicate Layer or press Ctrl+J (Windows) or Command+J(Mac).
Rename the duplicate for clarity, then move or combine it to expand your logo design.
5. Change color or select a gradient
Add a solid color:

Select your shape layer, then choose either the pen tool or shape tool (whichever you used to create it).
In the Fill or Stroke bar, click the color square to open the color options. You’ll see:
- No color
- Solid color
- Gradient
- Pattern
- Custom color picker
Pick a solid color from the recently used swatches or open the color picker in the top-right corner. Use the slider on the right to adjust brightness and contrast.
If you’re designing a brand palette, use hex codes to keep your colors consistent. Copy and paste your brand’s hex code into the color picker to quickly select the exact shade you need.
Add a gradient for blending effects:
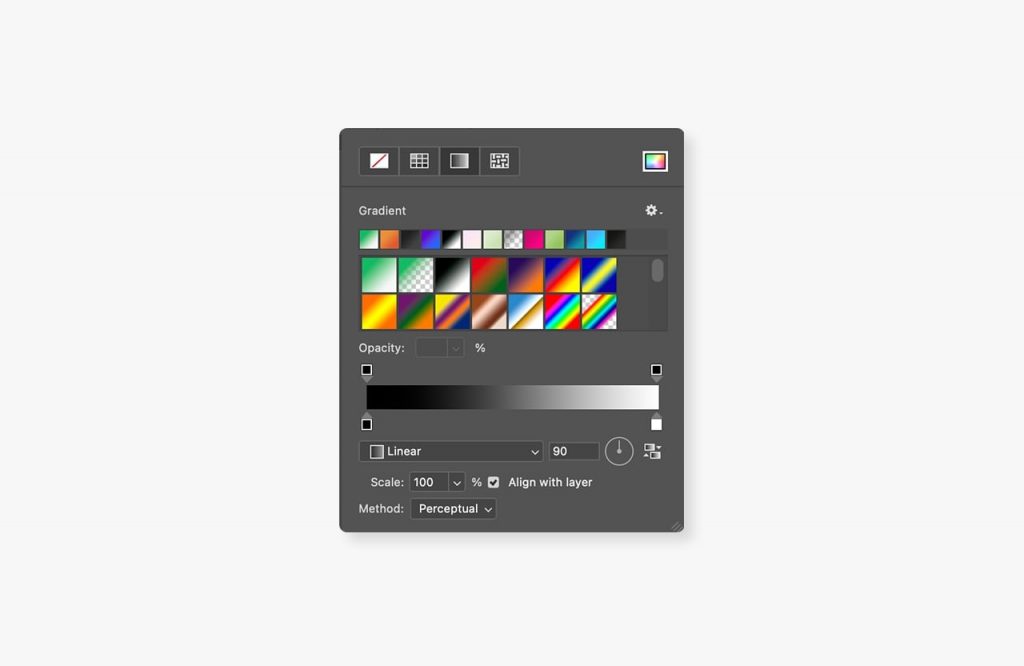
Repeat the steps above, but this time choose Gradient as your color mode. This applies a smooth color transition to your shape.
You can then adjust:
- Blending options
- Opacity
- Color slider
- Dimensions
- Rotation
- Scale
Double-click the arrows at the bottom of the gradient slider to open the color picker and select specific colors. Add more stops by clicking anywhere under the slider.
Drag the arrows at the top of the slider to refine the transition until you’re happy with the result. Adjust opacity, rotation, and scale to fine-tune the look of your logo design.
6. Add text
Your logo should work as a recognizable mark for your brand, whether it appears on products, websites, or marketing materials. Adding text is the final step that ties your design together.
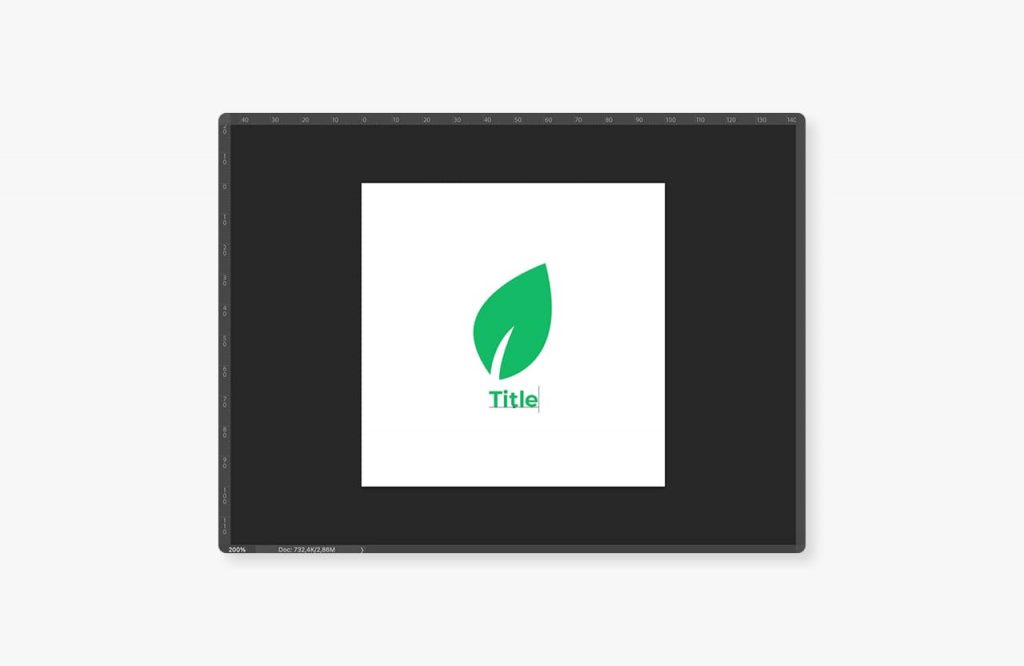
- Select the Type tool in the toolbar (or press T on your keyboard).
- Click and drag on the canvas to create a text box, then type in your business name, initials, or slogan.
- Use the options at the top of the workspace to adjust:
- Font style and weight (regular, bold, italic)
- Font size
- Text color
- Other text style features
To confirm changes, click the checkmark icon in the workspace. You can then move the text box to your preferred position and resize it just like any other shape.Here is where typography can shine. Experiment with fonts until you find one that reflects your brand’s style, and pair it with your shapes and colors to achieve a balanced, professional look.
Photoshop also lets you add extra effects through the Edit menu or by double-clicking the text layer in the Layers panel. Options like shadows, gradients, or outlines can give your text more depth and help it stand out in your overall logo design.
When you’re done, save your work in PSD for future edits, and export a PNG or JPEG format depending on where the logo will be used.
Additional tips to make a great logo
Now that you know how to make a logo in Photoshop, here are a few tips that can elevate your design.
Choose shapes wisely
Shapes influence how people see your brand. Circles often signal unity and community, triangles convey action and power, while squares suggest professionalism and stability.
Even simple lines matter. Vertical ones convey strength, while horizontal ones evoke a sense of calm and balance.
Keep it simple but relevant
A logo should be instantly recognizable. If you can sketch it in under ten seconds, it’s probably simple enough. Every curve and corner should have a purpose. A common mistake is adding too much detail, which makes the design harder to remember.
Find inspiration without copying
Look at competitors, but aim to stand out. Sometimes that means choosing a color palette or logo style that breaks away from industry norms. Where others are busy, go minimalist. If everyone uses red, try a different hue to catch attention.
You can also explore Photoshop’s built-in templates for layout ideas, then customize them to fit your brand.
Think about size and scalability
Your logo needs to look sharp on a business card, a hoodie, or a billboard. Because Photoshop is raster-based, scaling too far can cause pixelation. To avoid this, consider vectorizing your design in Illustrator once your Photoshop file is complete.
How to sell custom products with your logo
Once you’ve finished your logo design in Photoshop, the next step is putting it to work. A logo is more than just a file – it’s the foundation of your brand. And with Printify, turning your design into real products is easier than you think.
1. Sign up for free
Create your free Printify account in minutes. No upfront costs, no subscription fees.
2. Upload your logo
Go to the Printify Product Creator and upload your logo file. You can place your design on hundreds of products, from t-shirts and hoodies to mugs, tote bags, stickers, and more.
3. Customize and preview
Adjust placement, resize without compromising quality, and see how your logo appears on different backgrounds. Use our free tools to create mockups that you can instantly add to your store.
4. Connect your store
Printify integrates with all the major digital platforms, including Shopify, Etsy, Squarespace, and more. Just connect your shop, publish your products, and you’re ready to start selling.
5. We print, pack, and ship
Every order is automatically sent to our network of Print Providers. They’ll handle the printing and delivery straight to your customers – you don’t need to worry about inventory or logistics.
Start with Printify today and see your logo come to life on products people will love.
FAQ
You can create a logo in Photoshop by starting with a new file and setting your canvas size. Add a new or blank layer to keep the background transparent.
From there, use the Shape tool or Pen tool to draw a basic shape, add text using the Type tool, and customize colors. When finished, export your logo file as a PNG image with a transparent background so it’s ready to use across digital platforms.
Yes. Adobe Photoshop is one of the most popular graphic design tools, and it’s excellent for beginners learning the logo design process.
While Illustrator is better for vector-based work, Photoshop gives you full control over layers, editing tools, and different styles. It’s also flexible enough to fine-tune every element of your design, save your logo transparent, and prepare files in multiple formats.
To create a logo image in Photoshop, open a new blank layer on top of your background. Draw shapes using the Shape tool, add custom text, and adjust colors in the Options bar.
Use the free transform feature with the Shift key to resize without losing quality. When you’re done, delete the background layer to make your logo transparent, then save it as a PNG image for the highest quality.
While workflows vary, here’s a simple method you can follow:
- Open a new file in Photoshop and set your canvas size.
- Add a new or transparent layer for flexibility.
- Draw a basic shape using the Pen tool or Shape tool.
- Add your brand name or slogan using the Type tool.
- Apply color, gradients, or effects in the options bar.
- Use align and editing tools to fine-tune the entire image.
- Export your logo file as a PNG image with a transparent background.
This logo design process helps ensure your logo is clean, versatile, and easy to use across digital platforms.
Conclusion
Learning how to design a logo in Photoshop gives you the freedom to create a unique symbol that represents your brand across all digital platforms and products. With the right mix of shapes, text, and editing tools, you can experiment with different styles, keep the background transparent, and export your logo file as a high-quality PNG image.
The process can also be a lot of fun, giving you room to try new ideas before settling on the final version. A well-made logo works everywhere, from company websites to custom merchandise. Once your design is ready, upload it to Printify and start placing it on t-shirts, mugs, tote bags, and more.
Your logo design process doesn’t end with Photoshop. It’s the first step to building a recognizable identity that customers can trust. Now that you know the steps, open a new file, explore the tools, and create a logo that makes your brand stand out.


