Custom products, global reach
Ready to open an online store on the world’s top online marketplace? Awesome – let’s get you started!
In this guide, newbie sellers will learn how to list products on Amazon, optimize them with relevant keywords, and use Amazon’s generative AI to create a great product detail page.
We’ll also tell you the secret to streamlining the production and fulfillment process – Print on Demand.
Key takeaways
- You must create an Amazon Seller account to list products.
- There are separate processes for listing new and existing products.
- Bulk uploading saves time.
- Product images and descriptions are key for search engine optimization (SEO).
- Selling with Print on Demand is the easiest way to list products on Amazon.
What you need to list an item on Amazon
Before you start, make sure you have everything ready for a smooth listing process.
Selling Plan
Choose between the Individual and Professional selling plan based on your business needs. The Individual plan costs $0.99 per sale, while the Professional plan costs $39.99 per month, regardless of sales volume. Each plan provides access to different tools and services.
Amazon Seller Central account
Set up your Amazon Seller Central account by providing the requested info:
- Bank account and routing number
- Internationally chargeable credit card
- Government-issued ID
- Tax information
- Phone number
Product compliance with Amazon’s policies
Ensure your products comply with Amazon’s policies to avoid issues. Get familiar with Amazon’s product safety and restricted products policies.
Product ID (GTIN)
A Global Trade Item Number, or GTIN, is a unique identifier for products and is necessary to list items on Amazon. There are a few common types, and they help match a seller’s listing with the correct product detail page on Amazon.
For print-on-demand products, sellers can request a GTIN exemption if the product lacks a standard GTIN.
This exemption lets you list products without a GTIN, streamlining the listing process for unique or custom items. An exemption could save you quite a lot of cash, so it’s worth looking into.
Product details
Include these details in your Amazon listings:
- Title: Up to 200 characters, capitalizing the first letter of each word.
- Description: Detailed, keyword-rich text explaining the product. You can use around 40 backend keywords. Perform keyword research or use Amazon’s generative AI tool to save some time.
- Images: High-quality photos (at least 500 x 500 pixels) showing multiple angles and variations. Check out our guide on how to take great product photos. You’re allowed nine images per listing, and we suggest using them all to showcase different angles, lifestyle shots, and packaging details for consumer products.
- Bullet points: Highlight key features and benefits in short, descriptive sentences.
- Relevant keywords: Use to improve search visibility.
- Selling price: Set a competitive price to attract buyers.
- Variations: Include different colors, sizes, or scents, if applicable.
- Brand: The product’s brand name.
- Fulfillment channel: Specify whether you’re using merchant-fulfilled or Fulfillment by Amazon (FBA).
- Product category: Select the correct category so it’s more visible to shoppers.
These details ensure your product listings are attractive, informative, and easy for customers to find and purchase. For more information, visit Amazon Seller Central.
Product categories
Choose the right product categories to improve your listings’ visibility in search results.
Here are some ways to find the best category:
- Research similar products – Check out which categories similar top-selling products are assigned to.
- Amazon’s tools – Use the category suggestion tool in Amazon Seller Central to find the most appropriate category based on your product details.
- Amazon’s Browse Tree Guide – This guide helps you understand the structure of Amazon’s categories.
- Category-specific requirements – Ensure your product meets any specific requirements or restrictions for the chosen category.
Fulfillment method

Your fulfillment method is how you get products to your customers. It’s important to choose the right method to keep inventory management organized and set realistic expectations for shipping times.
Amazon has two primary fulfillment options:
- Merchant-fulfilled shipping (MFN). You manage your own inventory and ship products directly to customers. This method provides greater control over your stock but requires more effort in handling logistics.
- Fulfillment by Amazon (FBA). You send your inventory to Amazon’s fulfillment centers, and Amazon handles storage, shipping, customer service, and returns. FBA also makes your product eligible for Amazon Prime, enhancing delivery speed and customer trust.
Fun fact: Printify users can integrate with FBA for streamlined fulfillment.
Optional: Register your brand
Enrolling in Amazon Brand Registry is a valuable step for protecting and promoting your brand on Amazon. This program lets you protect your intellectual property and access enhanced marketing tools.
If your product has a brand name, you’ll have to go through the brand registry process so Amazon knows that you own the brand. You need a trademark to get approved.
Head to USPTO.gov and pay $250 to apply for the trademark. Once that’s done, let Amazon know your case number, and they will approve you for the brand registry.
By registering your brand, you gain access to advanced features such as A+ Content, Amazon Stores, and Brand Analytics, which can help you grow your audience and increase sales.
How to list existing Amazon products
There are two ways to list something on Amazon. The first is listing the same product that multiple other sellers already offer, and the second is uploading an entirely new product. We’ll go over how to list an existing product first.
Step 1: Go to Amazon Seller Central
Log in to your Amazon Seller Central account. This is your hub for managing all aspects of your Amazon business.

Step 2: Go to the catalog
Once logged in, navigate to the Catalog tab in the upper left corner of the main menu. This is where you manage your product listings and add new items to your store. Click Add Products to get started.
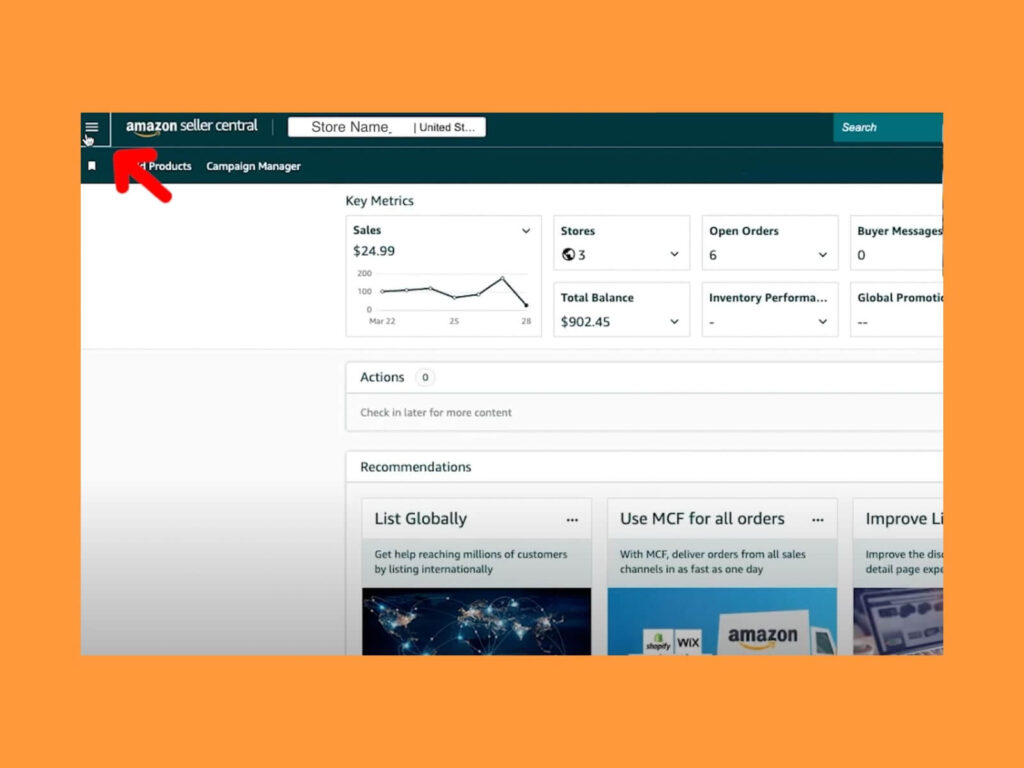
Step 3: Search for the product
Enter the name or GTIN or universal product code (UPC) of the product you want to list, or simply enter the title, description, or keywords. This will help you find the existing product listing on Amazon. Make sure the product details match exactly to avoid listing errors.
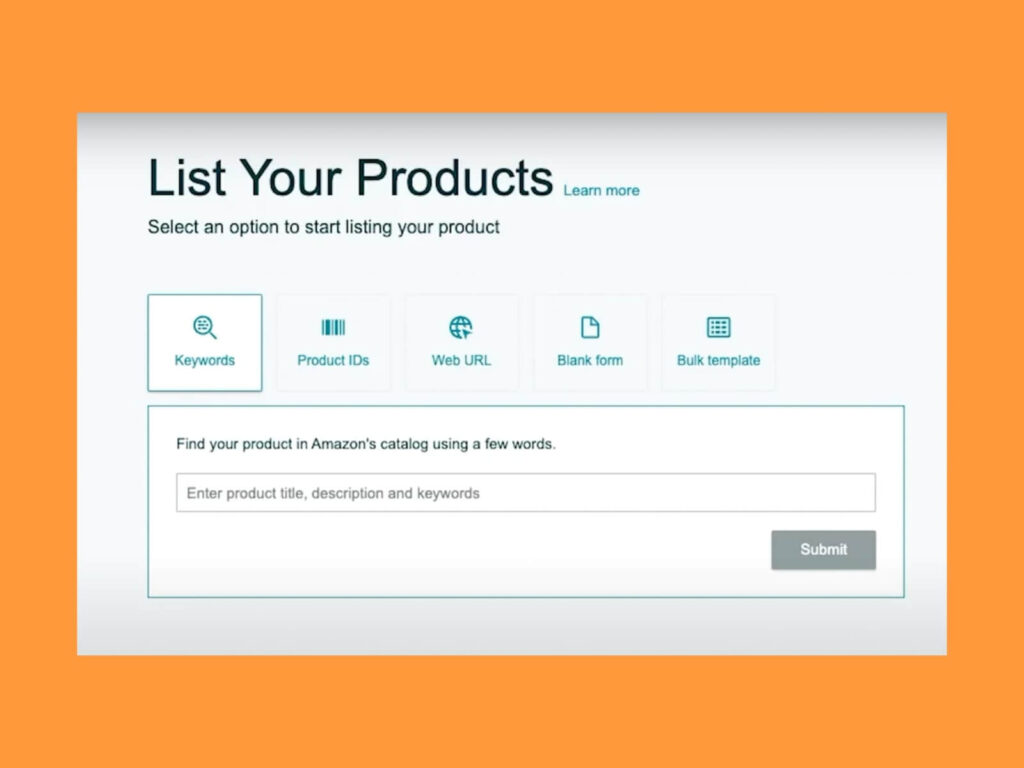
Step 4: Select the product
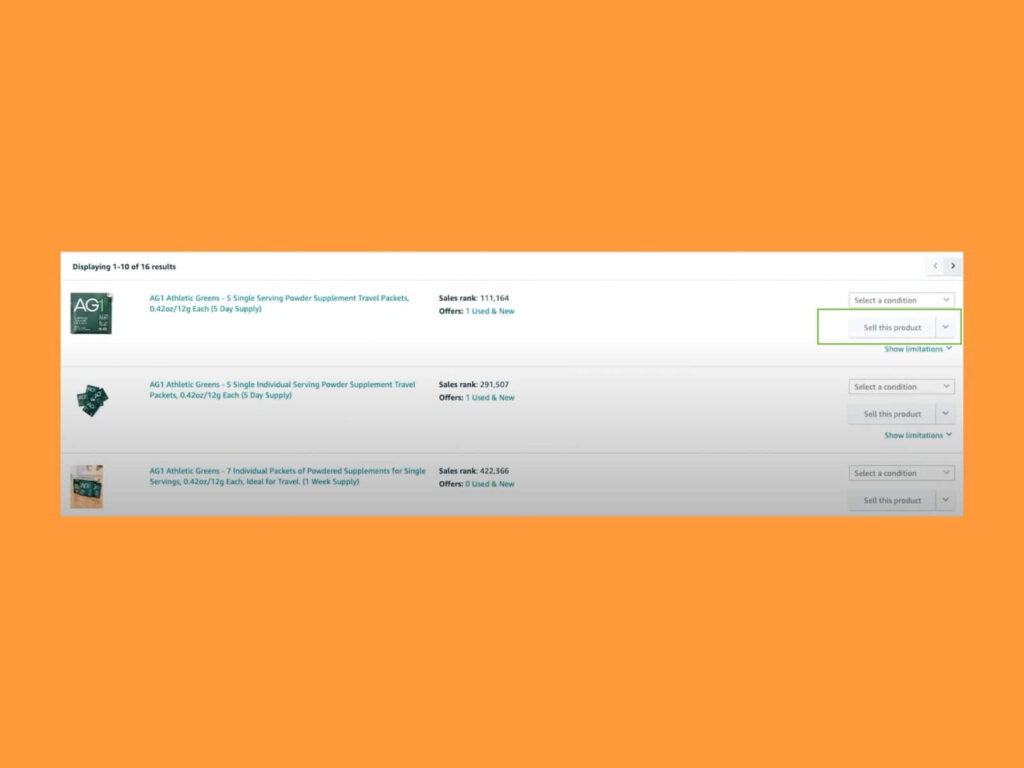
From the search bar results, select the correct product that matches your item. Ensure that all details match your product exactly to avoid any listing errors. Confirm that this is the product you wish to list.
Step 5: Click “Sell this product”
Click Sell this product next to the listing. This option lets you add your offer to the existing product detail page, ensuring you don’t create duplicate listings. This process is known as joining an existing listing. Then, indicate if the product is new or used.
Step 6: Enter offer details
Fill in the necessary info, like available quantity and your chosen fulfillment method (merchant-fulfilled or FBA). Add a SKU (stock-keeping unit) for internal inventory tracking.
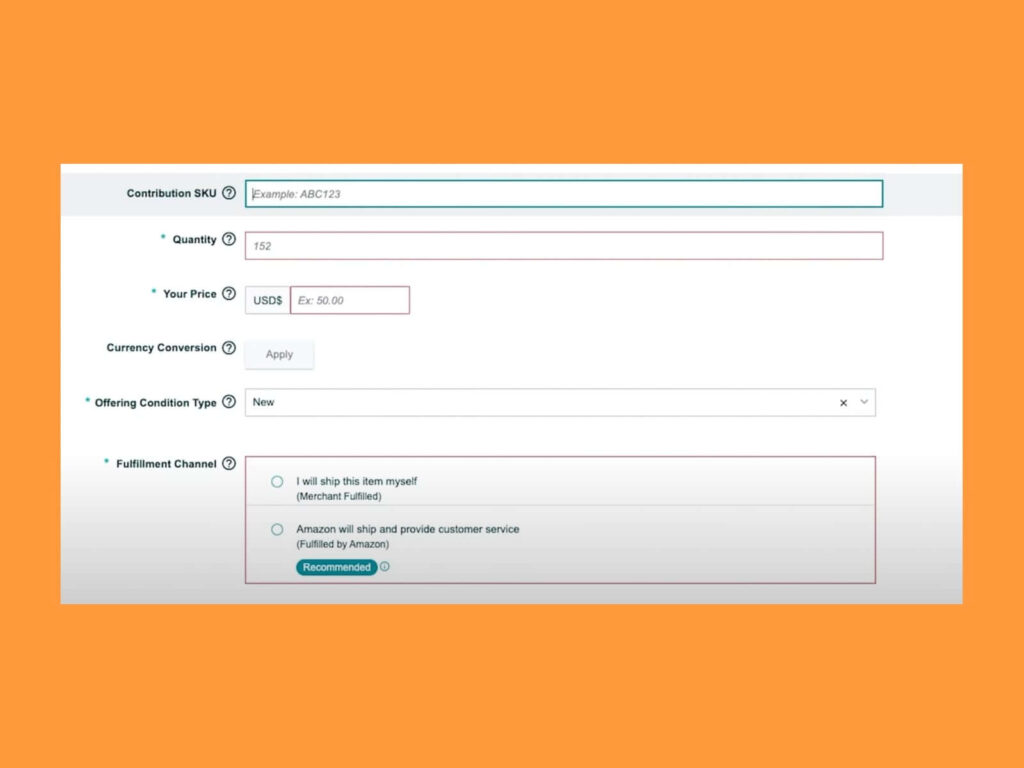
Step 7: Save and publish
If everything looks correct, click Save and finish. If you chose FBA, click List as FBA and Send to Amazon in the next window.
Your product will now appear under the existing product page and be ready for customers to purchase.
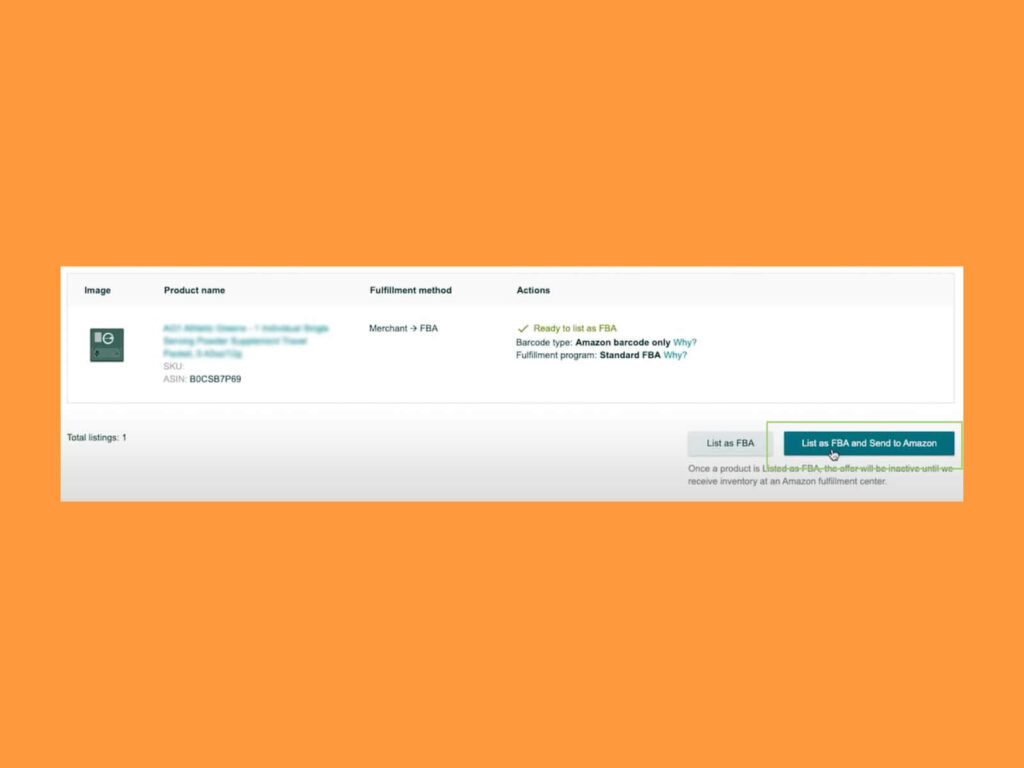
Remember to send your product to Amazon so they can fulfill your orders. Visit the Seller Central and click Inventory > Manage FBA Inventory > Send/Replenish Inventory. Pay special attention to the Ship from section because this is the address that Amazon will see and visit to pick up your products.
Fill in the packing details – either individual units, or a new case pack template. Remember that the entire package should weigh a maximum of 50 pounds. When you’re done, click Confirm and continue.
Pay special attention to the Who labels units section. Do this yourself or Amazon will do it for a separate fee.
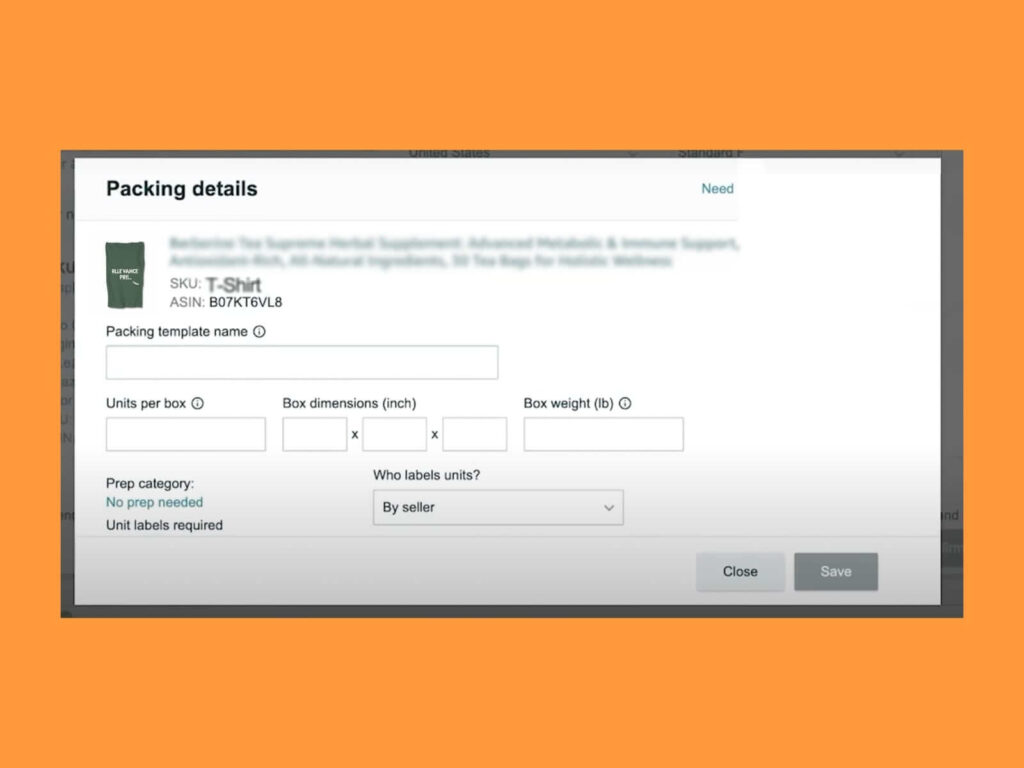
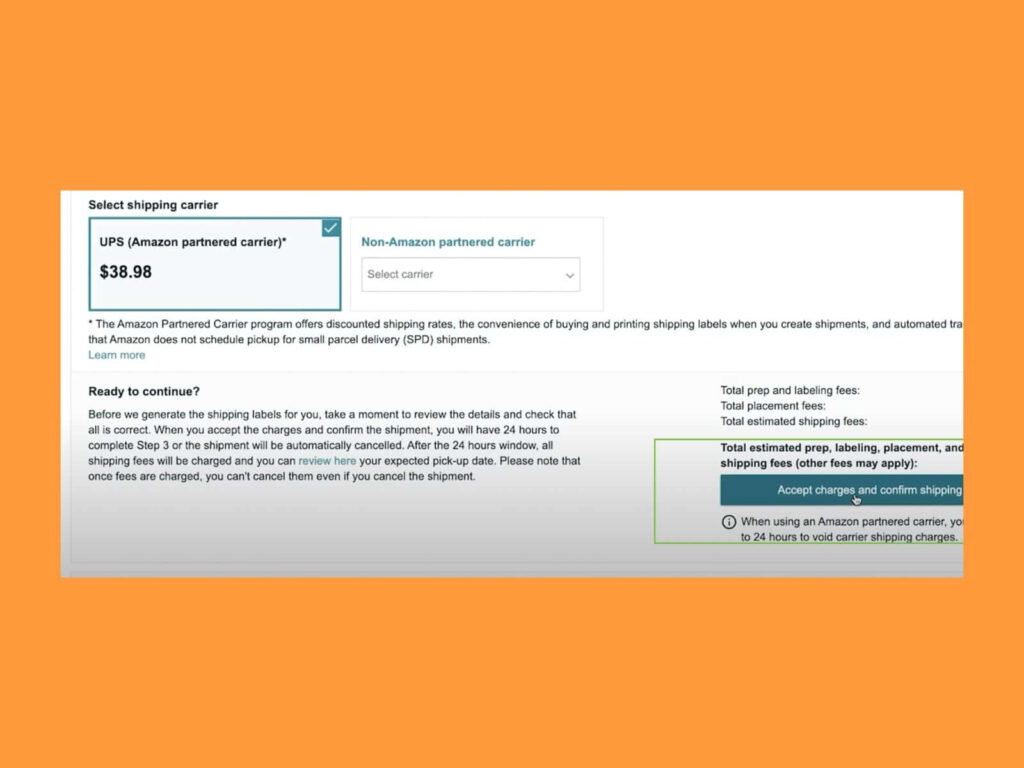
When done, click Save and move on to the next step. Here, you’ll either print and attach your labels or simply arrange the pickup date, shipping mode, and shipping service. Amazon will handle that for you after the products reach their warehouse. Click Accept charges and confirm shipping.
Now you know how to list something on Amazon and are ready to watch those sales coming in.
How to list new products on Amazon
Now, let’s talk about the other method – how to list an item on Amazon that nobody else is selling.
Step 1: Log in to Seller Central
To create a brand new listing, access your Amazon Seller Central account.
Step 2: Add a product
Navigate to the Inventory menu in Seller Central and select Add a Product. Choose the Blank form tab.
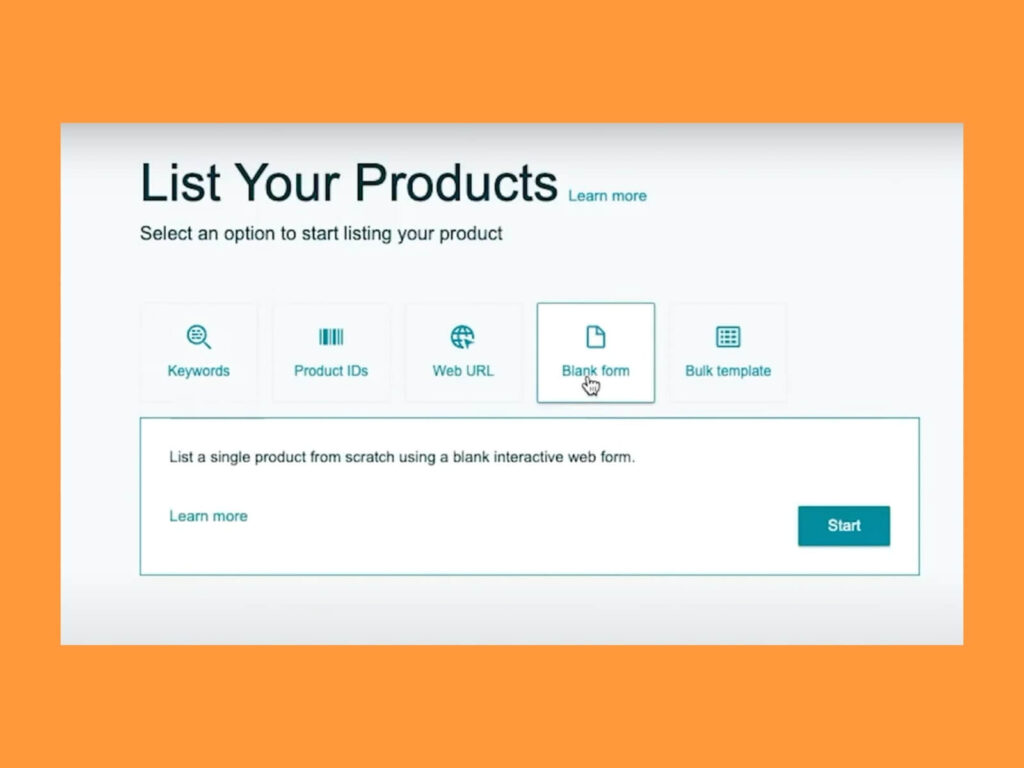
If you want to list a lot of different products, select Bulk template and do it using a CSV file.
Step 3: Fill out the vital info tab
The first thing you’ll do is name your item. This is going to be your product title that shoppers will see. Make it clear and descriptive, and include relevant keywords and key phrases to improve visibility in Amazon’s search results. This helps Amazon categorize your product correctly. Once done, click Save as draft.
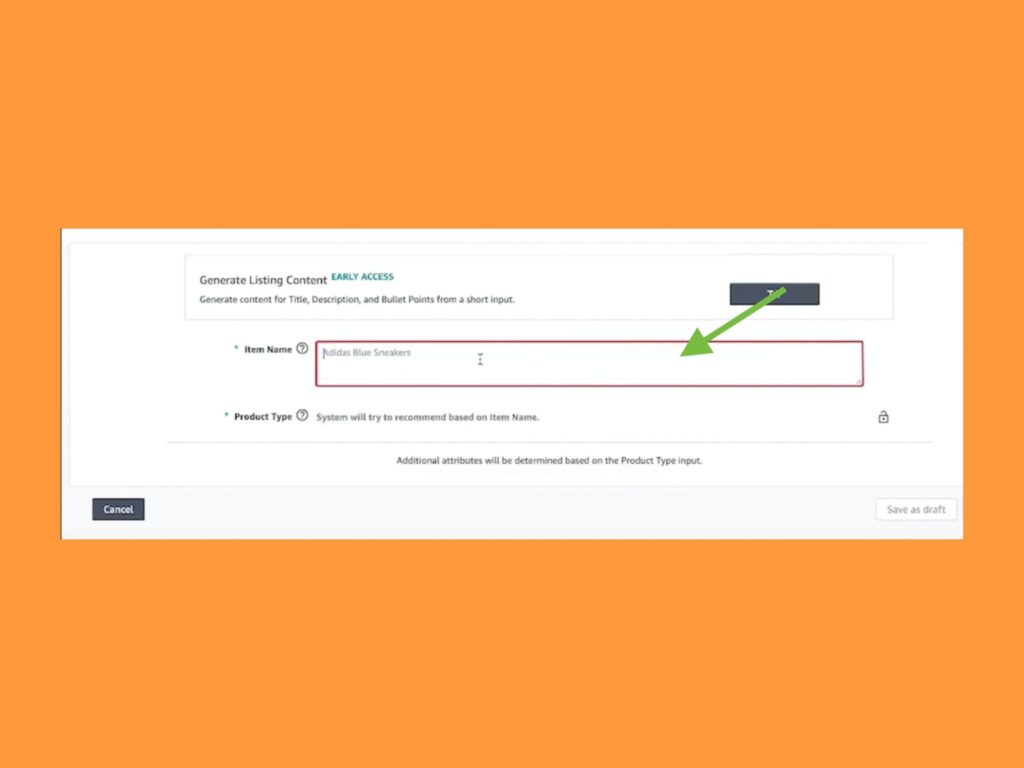
Read our article about Amazon SEO to make sure your listing gets to the top of search results.
Step 4: Select the product type
Based on your product name, Amazon will assign a category automatically, but you can change it if it doesn’t seem like the best option. Choose Select other and it will open a new menu with all the available sub-categories.
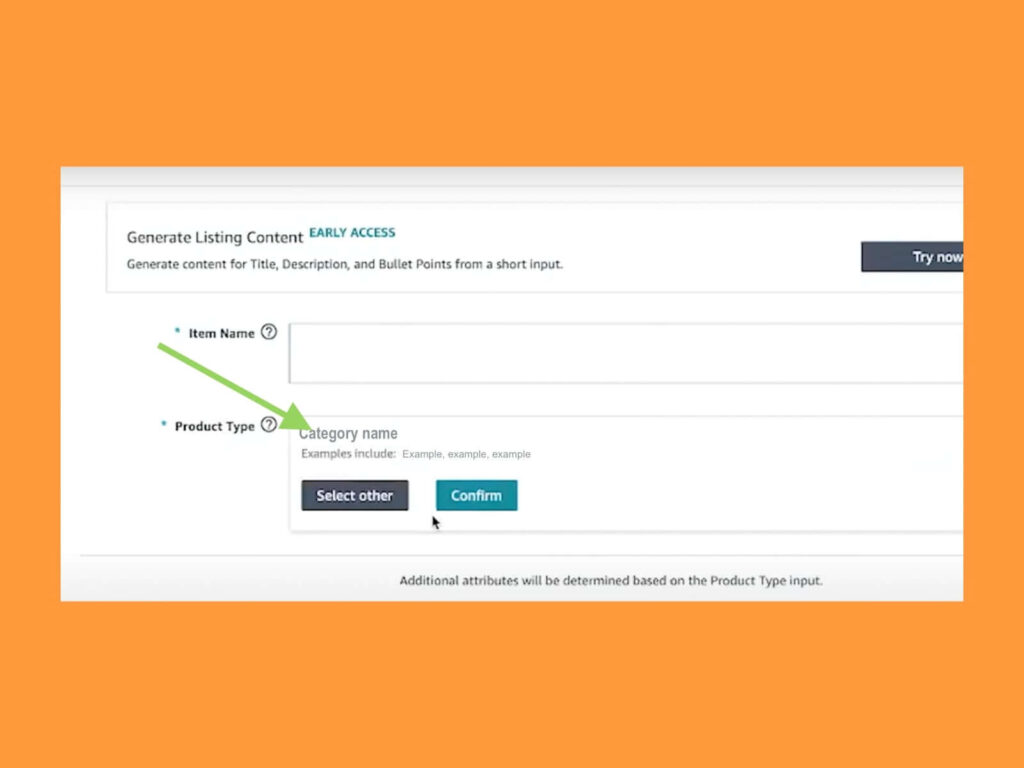
Your product may fall into multiple categories. If you’re not sure which category to choose, see what other Amazon sellers picked for similar products. Scroll to the bottom of a product’s page to see which category the product is in.
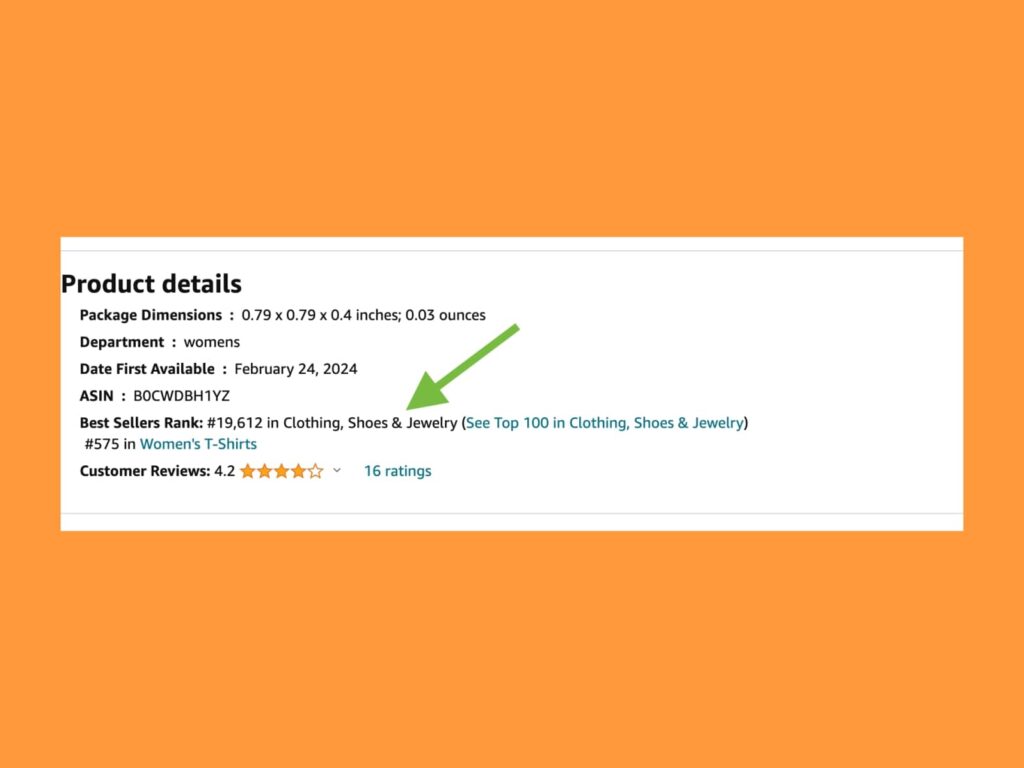
You don’t necessarily need to assign the most on-the-nose category because it might be too saturated with other similar products. Find other categories that’ll make it easier to get your product to the top of search results.
Step 5: Add a product description and photos
Write a detailed, keyword-rich description of your product – the things that people are going to be typing in the search bar when looking for an item like yours. This is one of the most important steps when you get to create a new product.
This is the perfect place to provide a compelling reason why people should buy your product. Tell your product’s story and provide all the key info to make it irresistible to shoppers. Use plenty of keywords – they’re your best friend here.
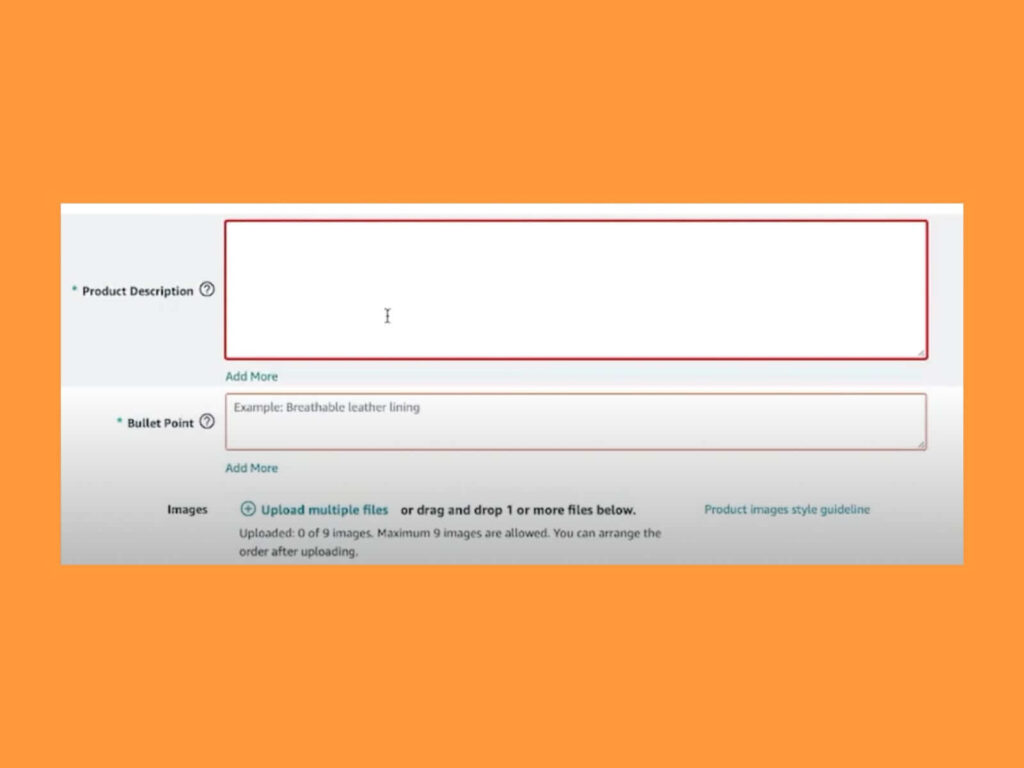
The same goes for the bullet points of your brand-new listing. Provide product features and sprinkle keywords throughout all five bullet points. Use your main keyword at the very beginning to attract more customers who are looking for your product.
Next up – product images. Upload high-quality photos that meet Amazon’s technical requirements (at least 500 x 500 pixels) to showcase your product in its best light.
When making your listings, find out what shoppers are searching for so you know what keywords to include. Use tools like Helium 10 – it’s irreplaceable when creating an Amazon listing. Incorporate these keywords into your title, bullet points, and description to improve search rankings.
Step 6: Provide product information
After you’ve selected the product category, it’s time to enter specific details.
- Item Name – This is your product title.
- Item Type Keyword – A word or phrase that helps Amazon categorize your product.
- Brand Name – Since you’re adding a new product, this will most likely be your brand name. Even if you’re using a third-party supplier for print-on-demand, white-label, and private-label products, you’ll still sell under your own brand.
If you don’t want to register your brand, check the box that says This product does not have a brand name.
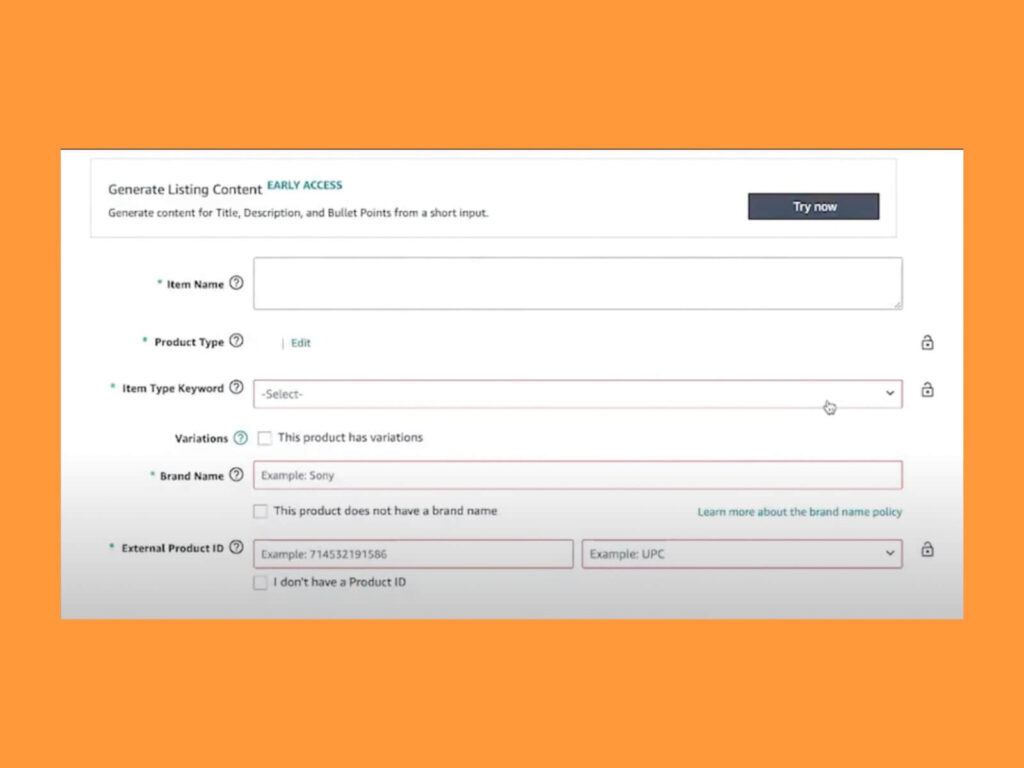
- Variations – Different colors, sizes, flavors, etc.
- External Product ID – This is what you’ll use for product tracking during the entire selling process.
- UPC (universal product code) – The worldwide tracking indicator for your item. To get UPC codes, visit GS1.org and select Get A Barcode. Each barcode costs $30, or you can get a bundle of ten for $250. Once you get the code, enter it in the External Product ID field. If you sell products that do not require UPC codes, check the I don’t have a Product ID box, and Amazon will make you apply for an exemption.
Once complete, click Apply to sell in the lower right corner.
If you’re not sure what any of the fields mean, hover over the question marks to get an explanation.
Step 7: Fill in the offer tab
- SKU number: This is just for your own use. If you don’t have one, Amazon will automatically generate a SKU for you.
- Quantity: This is only relevant to products fulfilled by the merchant.
- Your price: Set a competitive selling price that accounts for all related costs, including design, marketing, storage and shipping, and Amazon fees.
If you’re not sure how to price an item, check what similar products on Amazon are going for, then set a slightly higher price so the shopper knows they’re getting something more unique and better than the rest.
- Product condition: New or used
- Listing price: This isn’t what your customer actually pays. It’s the highest price you could theoretically charge. This acts as an anchor, making your actual selling price seem like a great deal by comparison.
- Fulfillment method: FBM or FBA
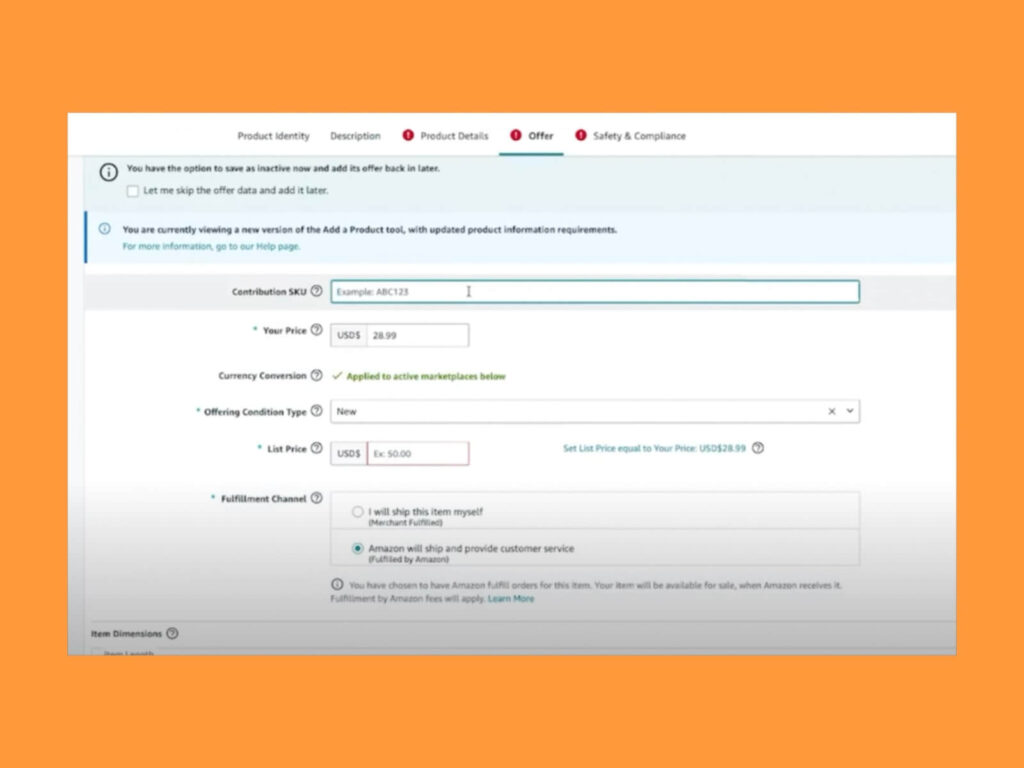
Click Save and finish. Go back to it any time to add more info or make adjustments.
Step 8: Add safety and compliance info
This is the place to add any relevant battery information for your product, upload safety data sheets, or include warnings like Prop 65, if applicable. This section may not appear for categories where this info isn’t relevant.
Step 9: Save and publish
Once you’ve filled out all the details, hit that Save and finish button, and you’re done. Congratulations, you’ve officially listed your first product on Amazon!
Amazon will assign your listing a unique ASIN (Amazon Standard Identification Number), and you’ll be able to see your product live on the marketplace in no time.
How to list products on Amazon with Printify
Printify makes it even easier to list your print-on-demand products on Amazo,n thanks to our integration. Once you’ve connected your Printify and Amazon Seller Central accounts, you’re free to create and publish your products directly from your Printify dashboard.
We handle the printing, fulfillment, and shipping so you can focus on designing and marketing your awesome creations.
1. Connect your accounts
- Head to the Store manager in your Printify dashboard and select Add a new store.
- Click the Amazon logo.
- Choose to create a new Amazon store or connect an existing one.
- Authorize the connection that pops up on the Amazon page.
- Request a GTIN exemption if you haven’t already done so.
- Click the green button to complete the setup.
2. Create and publish your products
- Choose an item from a US-based Print Provider and click Start designing.
- Upload your design or make something new in the Product Creator.
- Fill in your listing details, paying special attention to the bullet points and keywords for SEO.
- Select the appropriate shipping template (you’ll make these in your Amazon Seller account first).
- Set your price.
- Click Publish.
3. Verify and manage your product listings
- Your product will be visible to buyers within two days.
- Confirm your item is listed by searching for it on Amazon.
- Edit product information anytime using Amazon’s Manage All Inventory tool.
- Use Amazon’s AI to generate listing content and save time.
You may need brand approval to mention specific brands in your listings.
Apply for a GTIN exemption before publishing your first product in each category.
Order product samples and take photos since Amazon does let you publish Printify’s mockups.
Watch Leah explain in-depth how to sell on Amazon with Printify:
Conclusion: Setting new sellers up for success
Congrats – now you know how to add products, get them to your customers, and register your brand. Each product listing is a step closer to becoming an Amazon pro, so embrace the learning curve and sell those goodies to the world.


