Start a print-on-demand business today
Let’s explore how to create stunning artwork that’s ready for print using Adobe Illustrator, your trusty sidekick for crafting eye-catching designs.
We’ll cover everything from setting up your workspace and mastering essential tools to exploring advanced techniques like gradients, masks, and transparency. By the end of this guide, you’ll have the skills and knowledge to create designs that look as impressive on paper (or t-shirts, mugs, tote bags) as they do on your screen.
This post may contain affiliate links, which means we may earn a commission if you make a purchase through those links. This comes at no additional cost to you.
Key takeaways
- Adobe Illustrator is your go-to tool for crafting stunning, print-ready designs.
- Understanding the basics of color modes, resolution, and file formats is crucial for successful printing.
- Playing around with layers, shapes, fonts, and effects can make your designs stand out.
- Using masks and transparency can add depth and sophistication to your artwork.
- Services like Printify make the printing and fulfillment process a breeze, allowing you to focus on your creativity.
Getting started with Adobe Illustrator
Let’s kick things off by setting up your playground – Adobe Illustrator. This powerhouse software can seem intimidating at first, but once you get the hang of it, it’s smooth sailing.
Set up your workspace
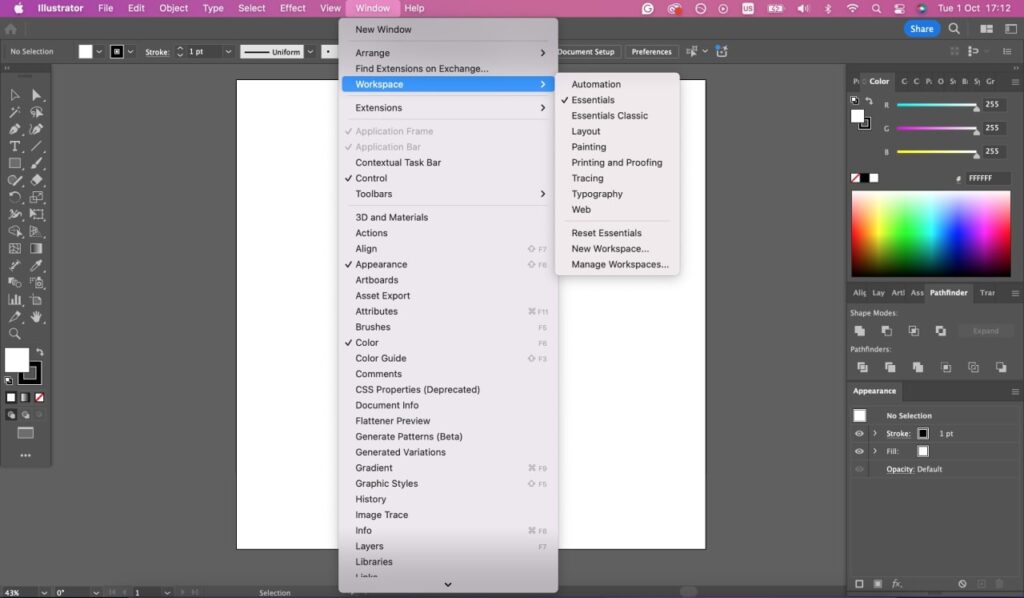
First things first, you need a workspace that functions for you. Illustrator is super customizable, so you can arrange the tools and panels to fit your workflow perfectly. Here’s a quick guide on how to do it:
- Open Illustrator – If you don’t have it yet, grab a free trial from Adobe’s website.
- Choose a workspace layout – Go to Window > Workspace and select a layout that suits your needs. The “Essentials” workspace is a good starting point.
- Customize panels – Drag and drop panels like Layers, Brushes, and Swatches to where you want them. You can dock them on the sides or float them around.
- Save your workspace – Once you’re happy with your setup, save it by going to Window > Workspace > New Workspace.
Basic tools and features overview
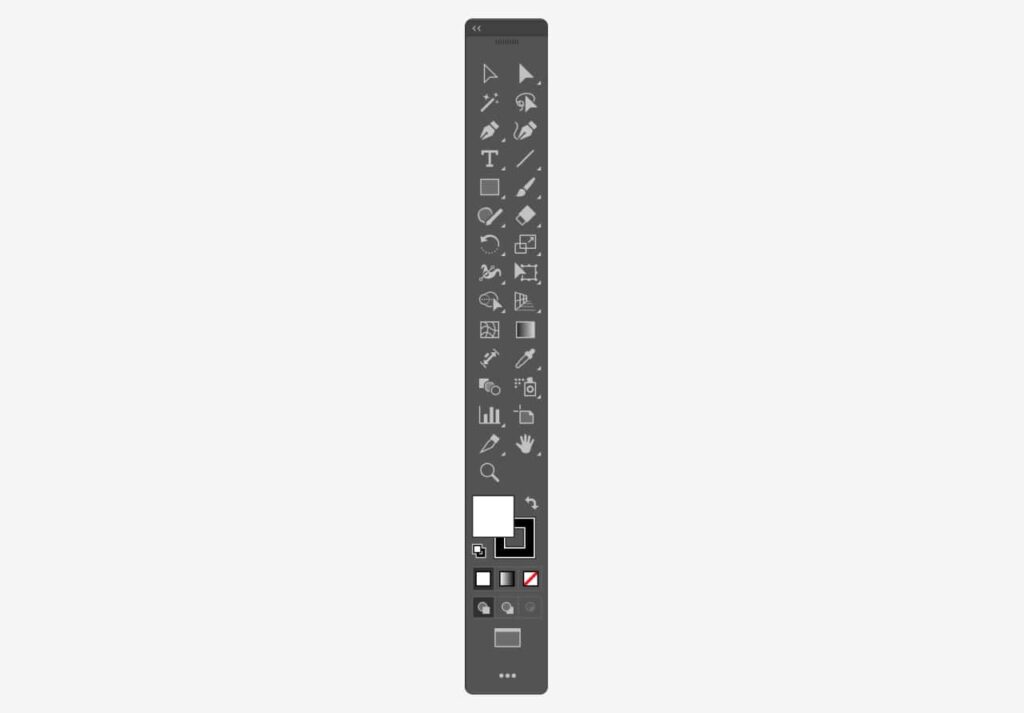
Now, let’s get familiar with some basic tools and features you’ll be using.
- Selection tool (V) – Use this to select and move objects around.
- Direct selection tool (A) – Perfect for selecting and modifying specific anchor points or paths.
- Pen tool (P) – Your go-to for creating custom shapes and paths.
- Shape tool (M) – Create rectangles, ellipses, polygons, and more.
- Type tool (T) – Add and manipulate text.
- Layers panel – Organize your design elements in layers for better control.
- Color and swatches panel – Manage your color palette and apply fills and strokes.
What are the requirements for Print on Demand?

Before we dive into creating your masterpiece, let’s cover some essential requirements for POD designs.
- Ensure your designs are at least 300 DPI (dots per inch) for crisp prints.
- Use CMYK color mode for print designs as it offers better color accuracy for printing compared to RGB.
- Include a bleed area (usually 1/8 inch) to ensure your design prints edge-to-edge without white borders.
- Keep important elements within the safe zone to avoid them being cut off during printing.
Curious about trying Adobe products? Receive 20% off your Adobe Photoshop monthly subscription or two months of FREE Adobe Express!
Create your first design with Adobe Illustrator
Now, you’re ready to create some magic. Let’s walk through the steps to bring your first design to life in Illustrator.
Create a new project file
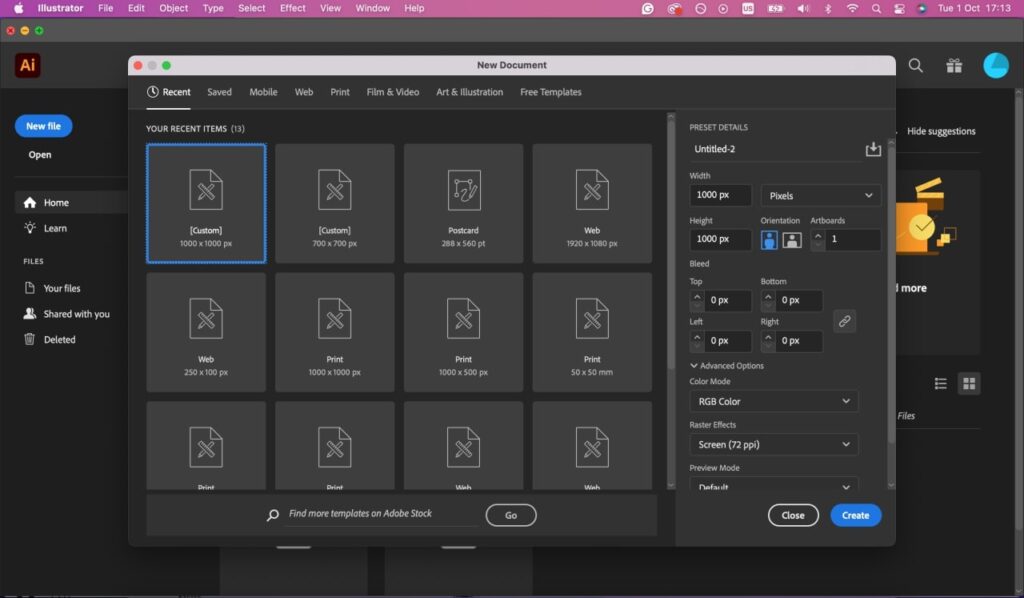
To start a new project:
- Open Illustrator – Go to File > New or press Ctrl+N.
- Set up your document – Choose the dimensions for your project. For print, set the resolution to 300 DPI and the color mode to CMYK.
- Create your document – Click Create, and you’re ready to go!
For more detailed instructions, check out this guide on creating a new document.
Working with layers and groups
Layers and groups help you keep your design organized and make it easier to manage different elements.
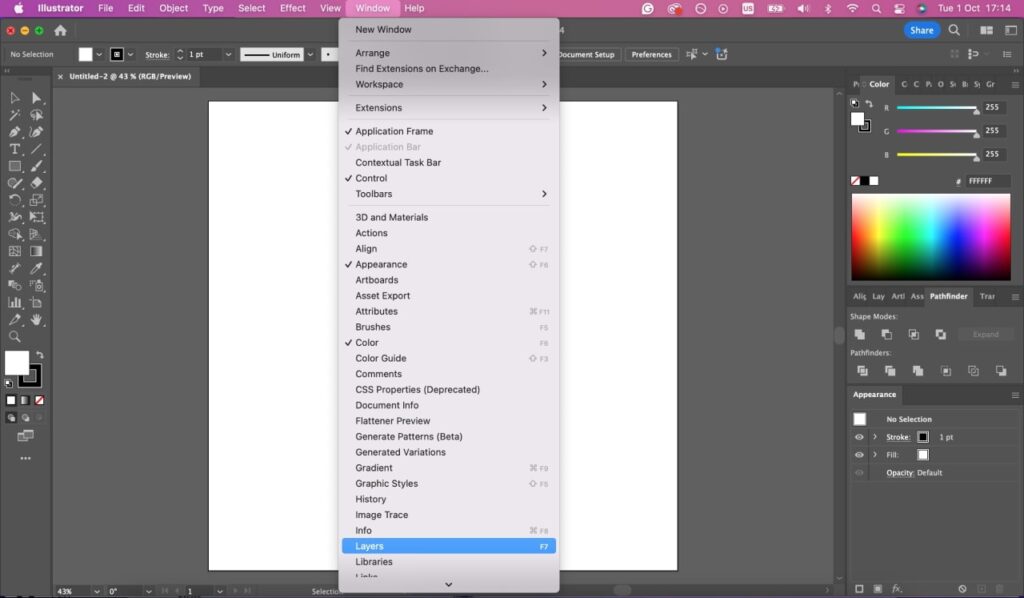
- Open the Layers panel – Go to Window > Layers to open the Layers panel if it’s not already visible.
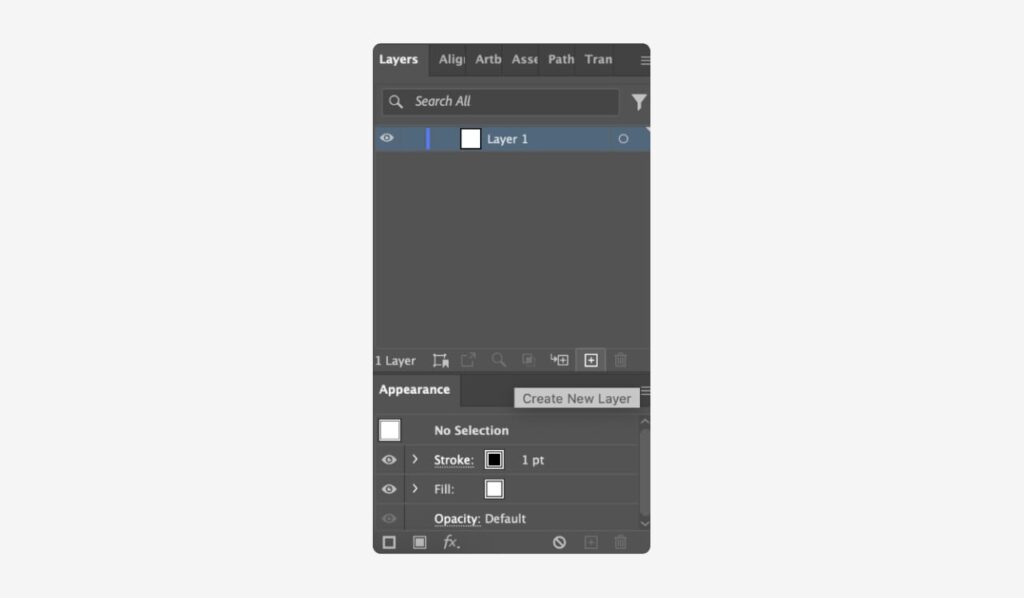
- Create new layers – Click the Create New Layer button at the bottom of the panel. Layers can be used to separate different elements of your design, like background, text, and images.
- Naming layers – Double-click on a layer’s name to rename it for better organization (e.g., “Background”, “Text”, “Graphics”).
- Group elements – Select the objects you want to group together, right-click, and choose Group or use the shortcut Ctrl+G (Cmd+G on Mac). Grouping makes it easier to move and scale multiple objects at once.
- Lock layers – You can lock layers to prevent them from being edited or moved accidentally. Click the lock icon next to the layer’s name.
- Lock layers – You can lock layers to prevent them from being edited or moved accidentally. Click the lock icon next to the layer’s name.
Here’s a handy guide on working with layers.
Creating and drawing shapes
Illustrator offers various tools for creating and drawing shapes, from basic geometric shapes like rectangles and circles to more complex organic shapes using the Pen tool. Experiment with different shapes and combine them to create unique designs. Here’s how:
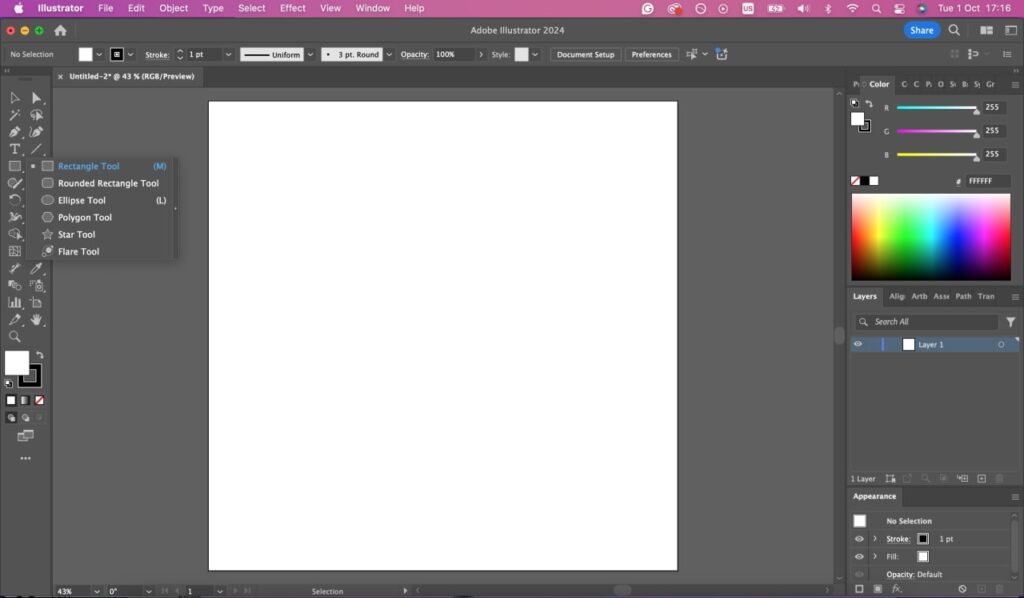
- Select a shape tool – Choose from the Rectangle, Ellipse, Polygon, or Star tools in the toolbar.
- Draw your shape – Click and drag on the canvas to create your shape.
- Edit your shape – Use the Direct Selection Tool to adjust anchor points and paths.
- Combine shapes – Use the Pathfinder panel (Window > Pathfinder) to combine multiple shapes into complex ones (e.g., uniting, subtracting, intersecting shapes).
Learn more about creating shapes.
Choosing and pairing fonts
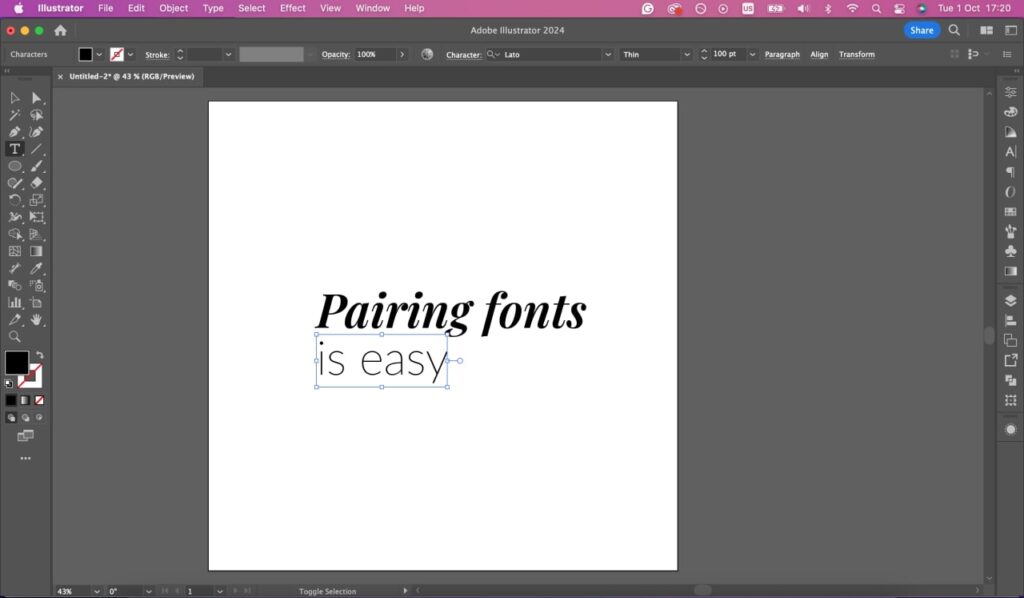
Typography plays a crucial role in design. Choose fonts that are readable and complement your artwork. Consider your brand’s personality and the message you want to convey.
Pair different fonts for visual interest and create a hierarchy using different sizes and weights. Here’s an easy way how to choose and pair them:
- Select the Type Tool (T) – Click on the canvas and type your text.
- Choose a font – Go to the Character panel (Window > Type > Character) and pick a font from the dropdown menu.
- Pair fonts – Use contrasting fonts for headings and body text. For example, pair a bold sans-serif font with a sleek serif font.
- Adjust text – Change the font size, letter spacing (kerning), and line spacing (leading) in the Properties panel.
Importing images and graphics
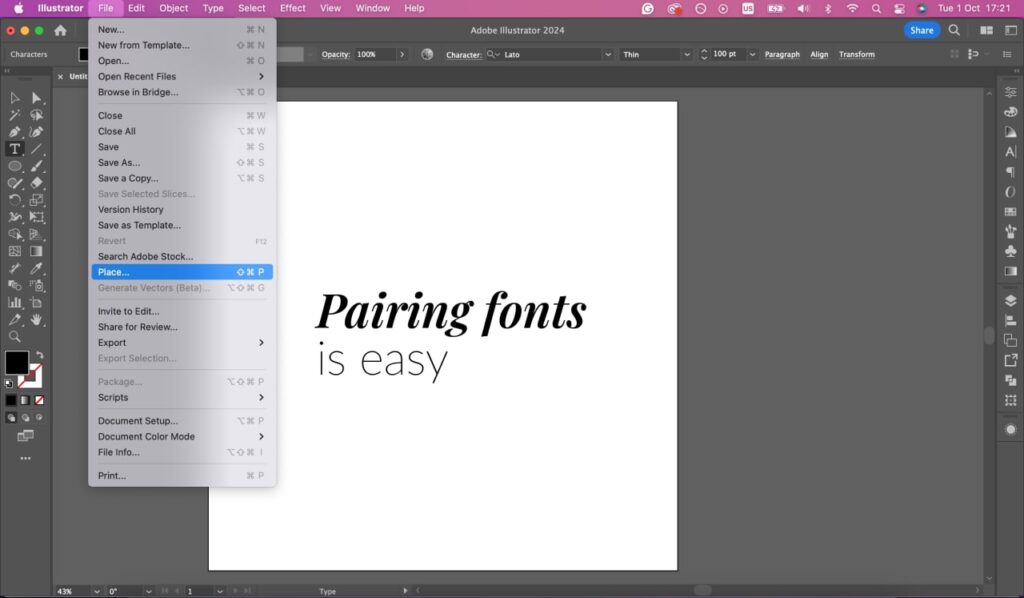
Adding images and graphics can elevate your design. Here’s how to do it:
- Go to File > Place. Choose the image you want to import.
- Position your image. Click on the canvas where you want the image to appear.
- Embedding vs linking – Choose to either embed the image (making it part of the file) or link to it (keeping the file size smaller but requiring the linked file to be accessible).
- Adjust your images – Use the Control panel to adjust the image’s size and position. For more advanced editing, you might use the Transparency panel to blend the image with your design.
For more details, visit this guide on importing graphics.
Applying gradients and effects
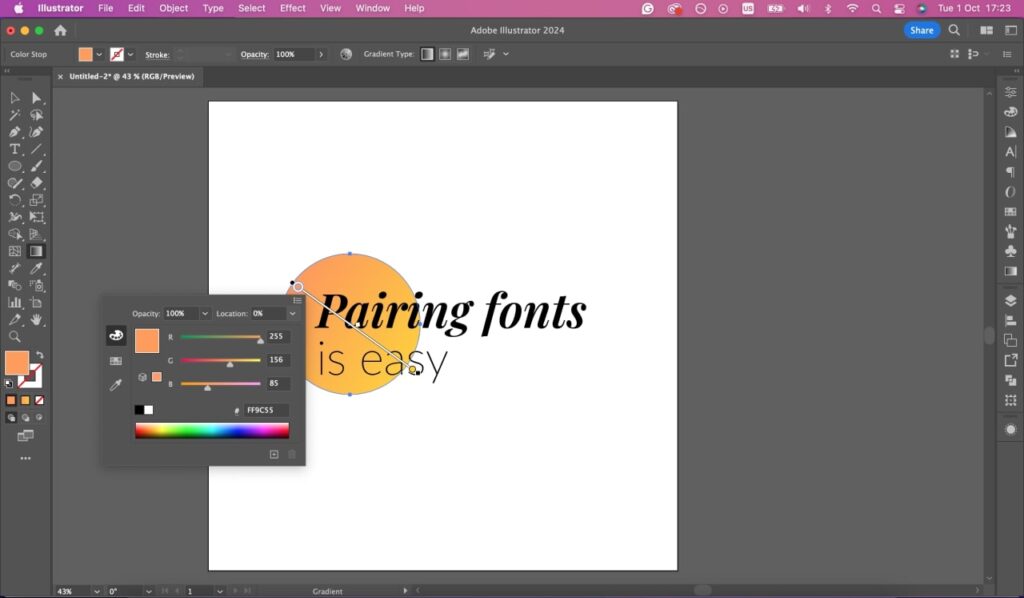
Gradients add depth and dimension to your designs, while effects like drop shadows and glows can create a more polished and professional look. Illustrator offers a wide range of gradient and effect options, so experiment and find the ones that best enhance your artwork.
- Select object – Click on the object you want to apply a gradient or effect to.
- Gradient tool (G) – Select the Gradient Tool from the toolbar. In the Gradient panel, choose between linear and radial gradients. Click and drag on the object to apply the gradient.
- Adjusting gradients – Use the Gradient panel to add or remove colors, adjust the direction, and fine-tune the gradient.
- Adding effects – Go to Effect in the top menu, then browse effects under Stylize, Distort & Transform, etc. For instance, you can add a drop shadow or an outer glow to make your object pop.
- Appearance panel – Use the Appearance panel to manage and edit multiple effects applied to an object.
For more on gradients and effects, check out these gradient and effects guides.
Using masks and transparency
Masks allow you to hide or reveal specific parts of your design, while transparency controls the opacity of objects. These powerful tools can add depth, complexity, and visual interest to your artwork. Here’s how:
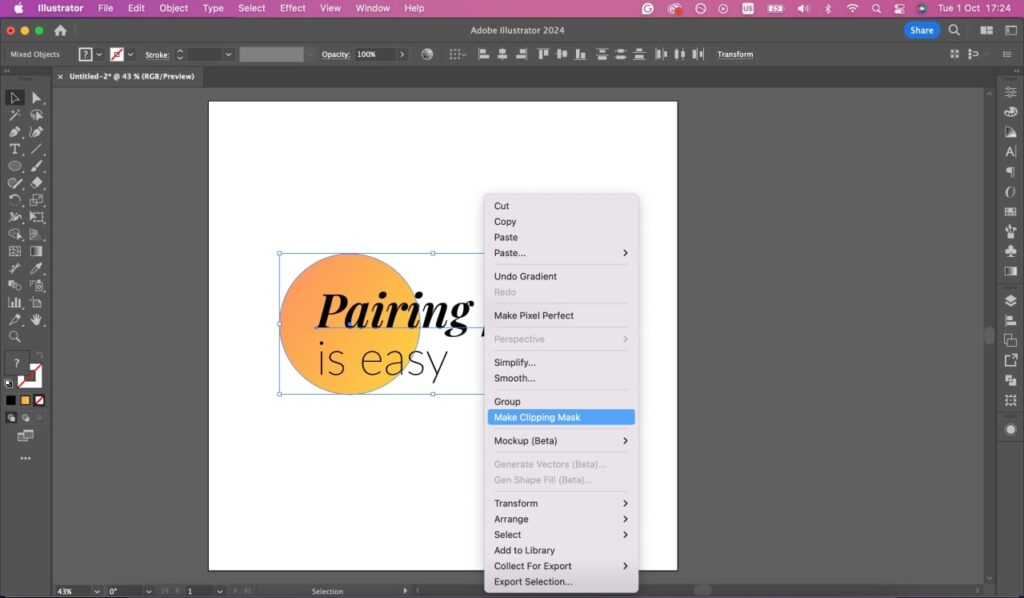
- Clipping masks – Select the object you want as the mask, then the object you want to mask. Right-click and choose Make Clipping Mask. This hides everything outside the mask shape.
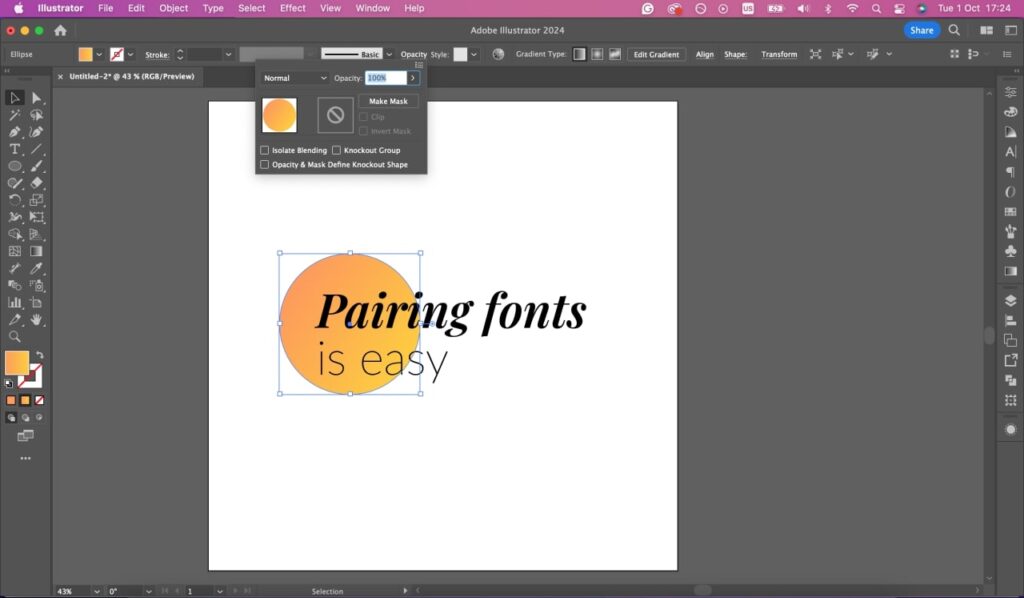
- Opacity – Adjust the transparency of an object in the Transparency panel. Slide the opacity percentage to make your object more or less transparent.
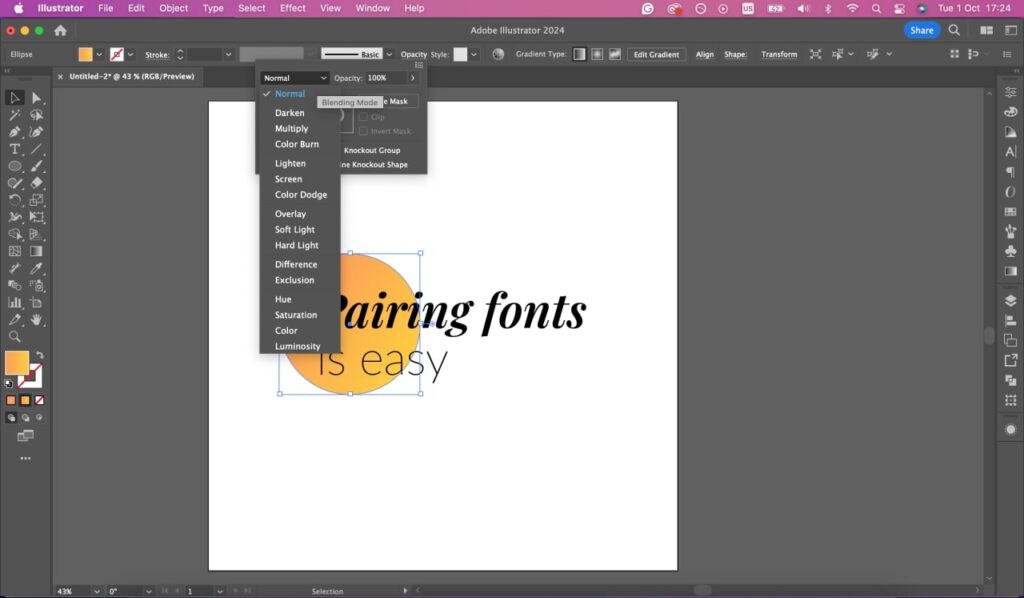
- Blending modes – In the Transparency panel, experiment with blending modes (e.g., Multiply, Screen) to create different visual effects by blending colors and layers.
For more details, visit Adobe’s guide on masks and transparency.
Exporting your designs
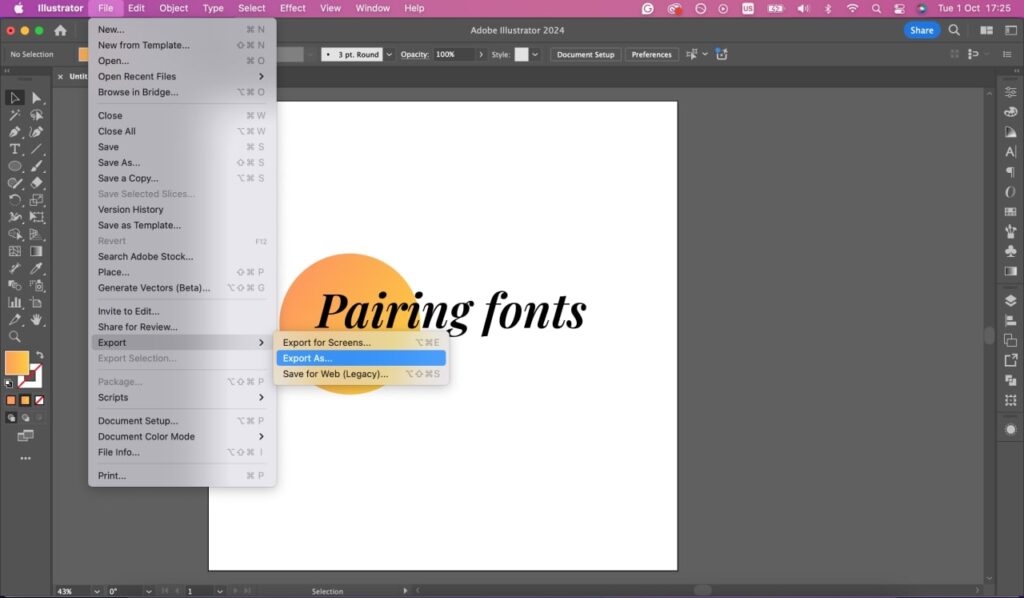
Once you’re satisfied with your design, it’s time to prepare it for printing. Export your artwork as a high-resolution file in a format that your print-on-demand provider accepts, typically PDF, PNG, or JPEG.
- File > Export > Export As: Choose this option to export your file.
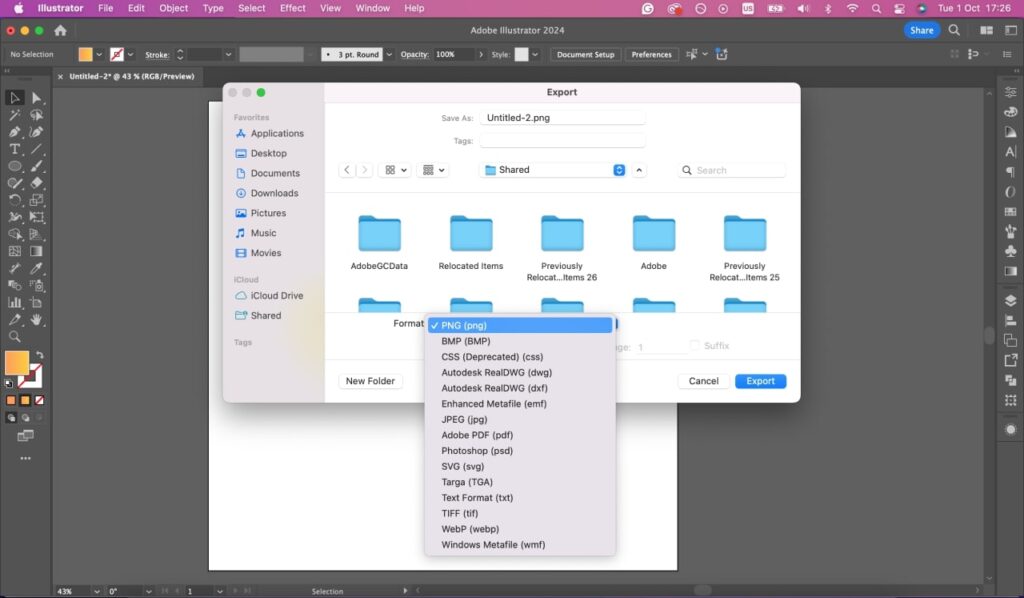
- Choose Format: Select a format suitable for printing, such as PDF, TIFF, or high-resolution JPEG/PNG.
- Resolution: Ensure your resolution is set to 300 DPI to maintain print quality.
- Export Settings: For PDFs, ensure you include bleed settings and select Press Quality for the best results. For images, select Maximum Quality.
Check out this guide for more exporting tips.
Remember, a high-quality print starts with a high-quality file, so don’t skimp on the resolution or file format. Your customers will thank you for those crisp, clear designs!
Make it happen today!
Start an eCommerce business with Printify

Now that you’ve mastered the basics of Illustrator, start creating designs, placing them on products, and selling them to the world. And there’s no easier way to do it than with Printify. How? Like this:
1. Sign up
First, create a free Printify account – it’s fast, easy, and accessible to anyone. Register with your email or Google account from your desktop or mobile device.
2. Select products
Printify is home to the biggest product Catalog on the market. We’ve got everything from classics like t-shirts and hoodies to home decor products, pet accessories, calendars, and wireless smartphone chargers.
3. Apply your designs
When you’ve selected the product, tap Start Designing, and you’ll land in our Product Creator. There, you can upload your Illustrator creations and adjust them onto the virtual product. But there’s more – you can also add various elements from our library, use the AI image generator, and much more.
4. Decide where to sell
Are your products done? Now, decide where you want to sell. A marketplace like Etsy or eBay? We integrate with them! A platform with a more customizable storefront like Shopify or Wix Store? Yup, Printify has integrations for them, too. Decide, connect, and publish your products.
5. Let Printify do the rest
And now for the fun part – selling. Once somebody buys a product from your store, you don’t need to lift a finger because we’ll handle 100% of the work for you. Production, packaging, and shipping are in our hands; you simply cash in the profits and focus on making your next designs.
Conclusion
Now you’re ready to start creating and selling print-on-demand products like a pro. Armed with the power of Adobe Illustrator and Printify’s seamless platform, you have everything you need to bring your artistic vision to life and build a thriving business.
From customizing your workspace and mastering essential Illustrator tools to understanding the nuances of print-on-demand requirements, you’re well on your way to producing stunning artwork that’ll wow your customers. And with Printify handling all the printing and fulfillment, you can focus on what you love most – creating and sharing your unique designs with the world.
So, crack your fingers and start creating. Let your imagination run wild and design your next masterpiece!
